
Automated Microsoft 365 Replies
Available in Version: 6.4.1 or greater
Release Date: 11/07/2025
This page provides an overview of the Automated Microsoft 365 Replies( AutoReplies 365 ) feature, highlighting its purpose, functionality, and benefits. It also details the necessary steps to configure and manage this feature within Case Manager, including prerequisites, set-up instructions, and best practices for effective use.
Background
The AutoReplies 365 feature automatically links email replies from Microsoft 365 accounts directly into their corresponding case within Case Manager, reducing manual processes and ensuring seamless communication tracking.

What Does AutoReplies 365 do?
-
Automatically monitors email replies from Microsoft 365 accounts.
-
Syncs replies to their respective Case in Case Manager using unique subject identifiers.
-
Offers flexible configuration options to monitor shared or individual employee email accounts.
Key Benefits
-
Saves time by automating email syncing.
-
Reduces the risk of missed communications.
-
Enhances productivity and communication accuracy.
Requirements
-
This tool is designed to be run against a 6.4.1 database that has been recently upgraded from an earlier version.
-
A valid Microsoft 365 account with appropriate permissions.
AutoReplies 365 Configuration
Microsoft 365 email replies can now be automatically linked to their corresponding Case in Case Manager, streamlining communication and organization. This feature requires activation by our Sales team and is not enabled by default. Once activated, users must have the necessary permissions to configure and utilize it. AutoReplies 365 integrates seamlessly with all supported versions of Case Manager version 6.4.1 or higher.
Enable AutoReplies 365
-
Navigate to Options > Email > Email Importer.
-
Tick the checkbox labelled "Enable the AutoReplies 365 Feature".
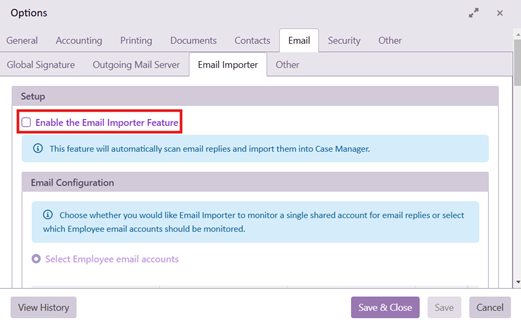
Note: If this feature has not been configured by our SalesTeam, a popup message will appear indicating that access is not yet enabled. Please contact the Sales team to activate this feature before proceeding.
Configure Email Monitoring
Select the Email Accounts to Monitor
-
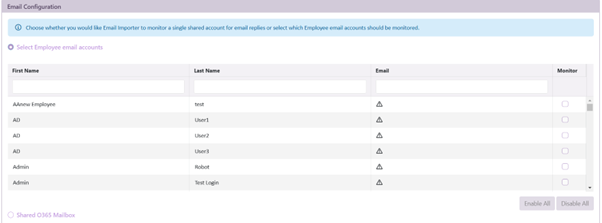
Under Email Configuration, click on “Select Employee email accounts”.
-
This setting allows you to choose if you would like to monitor a single shared account or select specific employee accounts.
-
Use the table to filter and find accounts.
-
Tick the checkbox under Monitor for each account you want to include.
-
-
Save your changes by clicking Save & Close.
Define Email Folder and Subject Identifier
-
In the Email Configuration section, you can specify the email folder to monitor:
-
Example: Inbox
-
This folder is scanned for email replies.


-
-
Configure the Subject Identifier:
-
The Subject Identifier is used to link replies to the correct Case.
-
The Subject Identifier is automatically inserted into the email subject when a new email is sent from Case Manager. To avoid clutter, we do not change the emails document title. The 'email subject' heading can be viewed under Document Properties -> Extended Properties.
-
You can customize the identifier or use the default provided ‘CM’.
-
The customised subject identifier will display as “Subject Identifier - CaseID”. For example ‘CM-1234. The hyphen and Case ID will be provided, please do not add the hyphen to the subject identifier.

-
Define Email Folder and Subject Identifier
-
In the Email Configuration section, you can specify the email folder to monitor:
-
Example: Inbox
-
This folder is scanned for email replies.


-
-
Configure the Subject Identifier:
-
The Subject Identifier is used to link replies to the correct Case.
-
You can customize the identifier or use the default provided ‘CM’.
-
The customised subject identifier will display as “Subject Identifier - CaseID”. For example ‘CM-1234. The hyphen and Case ID will be provided, please do not add the hyphen to the subject identifier.

-
Configure Email Processing
-
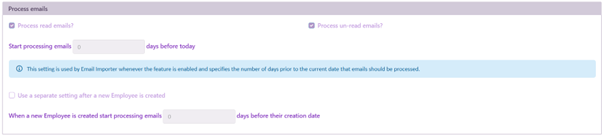
Specify whether to process Read or Unread emails:
-
Tick the appropriate checkboxes under Process emails.
-
-
Set the Start Processing Emails value:
-
Define the number of days prior to the current date to include in processing.
-
Example: Enter “0” to process emails starting today.
-
Configure OAuth Security
-
Under OAuth Security, input the following:
-
Client ID: Provided by your administrator.
-
Client Secret: Provided by your administrator.
-
Tenant: Your organization’s tenant name.
-
-
Click Test Connection to ensure the credentials are correct.

Note: For more information on setting up the Azure Registration please request a copy from our Support Team.
Save Your Settings
Once all fields are configured:
-
Click Save & Close to finalize the setup.
Additional Information
-
This feature is only available for Versions 6.4.1 or higher.
-
Ensure the correct permissions are set for monitored accounts. Refer to the Azure Application Configuration document that can be provided by our Support Team.