
Add employee/user
Logon accounts are set up at the Employee List. You add each of your employees here and specify a user name and password, along with membership in security group(s) that specify what they can see and do in the system.
Once this has been done an employee can be a user of your system.
Below are the essential steps for adding a new user to your system.
There are numerous optional fields where you can also enter information. For details start at Employee information.
Add user account
- Open the Employee list by selecting Lists > Employees from the main menu.
- Click New button

- Enter a User ID.
We recommend that you create the User ID from the employee's first name and if necessary, the first initial of their last name. Once created, the User ID cannot be changed.
- Enter the employee's first and last names.
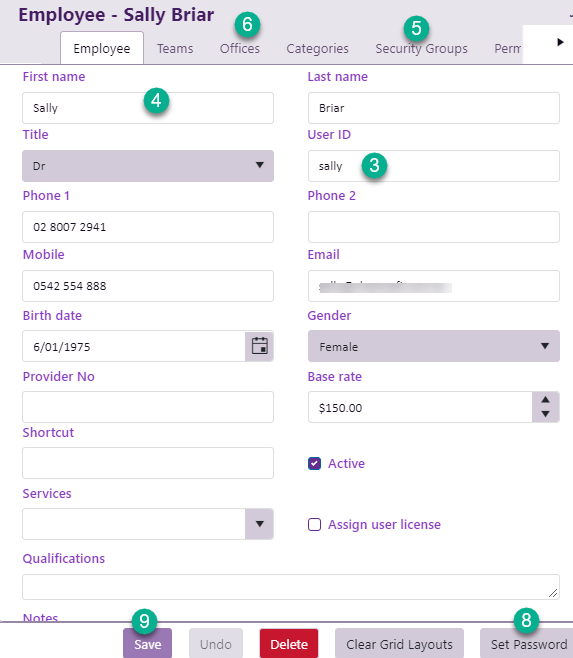
- Click the Security Groups tab.
- The new user is automatically allocated to your default office. This can be changed if required.
- Enter any other details as required, including phone numbers.
- Click Set Password to create a password for the user.
- Click Save
The employee must be a member of a security group in order to log in to the database.
Locate a suitable Security group and click Add>>.
Note that the System Administrator group gives permission to access every part of the software and is membership is usually very restricted.
For further information start at Introduction to security groups and permissions.
See Offices and teams for details.
You must add an email address to enable the employee to send emails from Case Manager.
You will probably need to add other email configuration details in the Email Server tab, depending on which version of Case Manager you are running and what kind of email setup you have at your business.
See Set up user email accounts.
The new employee is given this temporary password to start off with. After logging in they are forced to enter a new password.