
Add workflow steps
The screenshots on this page do not all reflect the new web version yet.
Before adding any steps you should read through Workflow steps.
Add step
In the workflow template click the Workflow Steps tab.
For each step:
- Click the New button
 to add a new workflow step.
 - On the right hand side select the Title from the dropdown list for this workflow step. You are choosing from options in the Task Titles List. This will be the title of tasks generated from this step.
- Select the status from the Status dropdown list. You are choosing from options in the Task Status List. This sets the status of the task.
- If you have information that you want to be included in the task, add it in the Details box.
- Select a Contact role from the dropdown list if the task should be associated with a contact. This contact's name will appear in the task.
You can see the Parent of this step, which is the step before this one in a sequence of steps. The Parent field is blank for the first step.
The next 3 options relate to the way time in understood in workflow steps, see Time and workflows for full details.
- Set the Duration of the task in days or hours. This is the maximum time it should take to complete. You can enter a decimal value here.
- If there is to be a Lag time, set the number of hours/days after the parent task was marked complete before this task is to start.
- Optionally click Reminder and enter a reminder lead time.
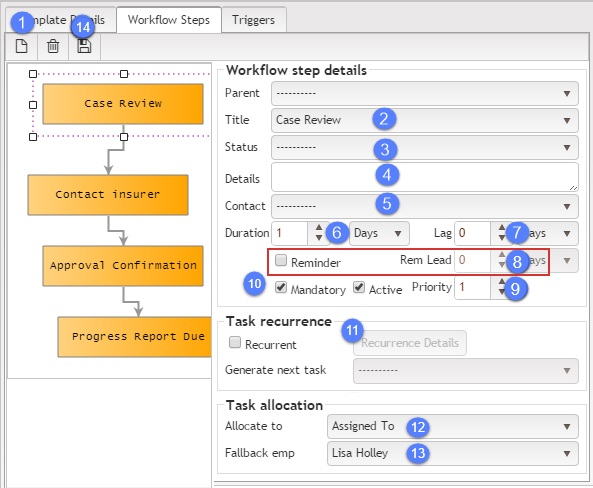
- Set the Priority and whether the task is Active (by default this is ticked).
- You may want to make the task mandatory. This forces users to enter a reason when it is completed late. See Mandatory workflow steps below.
- A step can also create a recurrent task, see Recurring workflow tasks to set this up.
The next 2 options relate to the responsibility for the task.
- Specify the user(s) allocated to the task generated by this workflow step by selecting from the Allocate to dropdown list.
- The Fallback emp is the employee to whom the task will be assigned if the primary role cannot be determined. For example, this applies if the task is allocated to the Team Manager but the case has no team.
- Click the Save button to save this step.
You can allocate the task to a user by name, by role (e.g. Assign To user) or membership role (e.g. Office Aministration Support).
The membership roles are those assigned to users through the Employee List, see Allocation of tasks to roles for more details.
Organisation
You create structures by adding steps and building relationships between them.
To create relationships between steps, add a step, keep it selected and then create a second step. The two steps will be automatically linked by an arrow.
There are several tools:
- Click the New icon to add a step.
- Click the Delete icon to delete the selected step(s).
- Click the Save icon to save the current steps and their layout.

When you add a step you can see the Parent value for the step. This is set as the preceding step in a sequence of steps, except for the first step, where it is blank.
You can select other steps from the dropdown list in order to rearrange the order of and relationships between steps.
Mandatory workflow steps
Most workflow steps are mandatory, but some are optional.
While it's beneficial to include optional steps in a workflow, they can introduce several problems when the task does not need to be performed.
The mandatory checkbox was added to help you deal with optional tasks:
- If an optional task does not need to be performed, users still need to mark it complete to remove it from their list of Tasks. However in this case they can un-tick the finished checkbox to indicate that they did not perform the action.
- Tasks created from a mandatory workflow step will always require that a reason is entered when they are completed past the due date or marked complete without being finished. This is optional for non-mandatory tasks.
- When you are using the list of Tasks to check non-compliance (e.g. overdue tasks) amongst employees, you can easily exclude any tasks that are not mandatory.
- The mandatory property could also be used to exclude optional tasks from a custom non-compliance report within an SQL query.