
Booking appointments in My Calendar
In My Calendar you book appointments for yourself. To book for another employee, use the Scheduler.
Appointments are booked with a three-step wizard: Select Client → Configure Appointment → Add Costs. Fields marked with a red asterisk (*) are required. Move between steps with < Back and Next >, or click Cancel at any time to close the wizard without saving.
Starting a booking
Either:
- click + New Appointment at the top right, or
- double-click an empty time slot. The wizard opens with that date and time already filled in, or
- if you have no appointments in the period shown, click + Create Appointment in the middle of the calendar.
Select Client
- Click the Client drop-down. Type in the search box to filter the list. Each client is shown with their location to help you pick the right one.
- Select the client and click Next >.
Configure Appointment: type, time and place
The client is shown at the top and can't be changed here.
- Appointment Type (required): choose the kind of appointment, such as Initial assessment or Work site visit. The wizard title changes to show the type. The type decides which costs, invoice options and notifications apply, see Appointment types.
- Appointment Status: set to Booked by default. Change it if needed.
- Assigned to: the employee the appointment is for. When you book from My Calendar or the Scheduler, this is set before this step and can't be changed here.
- Attendees: to invite people, expand Attendees and choose from the case's contacts (for example, the client or the employer) or the employees allocated to the case. Allocated employees are the Assigned to employee and Other Staff in the case's Allocation section. The client isn't added as an attendee automatically.
- Start date and End date: set the date and time. Tick All day for an all-day appointment, or tick Recurrent and click Recurrence Details for a repeating appointment.
- Time Zone: defaults to your organisation's time zone, which an administrator sets under Tools → Options → General. Change it only if the appointment is in a different time zone. See Time Zones.
- Location and Room:
- For an appointment at one of your offices, choose the office as the Location, then choose a Room. A room is required for office appointments. Only rooms belonging to that office are listed.
- For an appointment away from your offices, such as at the client's primary address, choose the Location only. No room is needed.
- Details: add any notes about the appointment.
- Click Next >.
If Microsoft 365 calendar sync is set up, each attendee with a valid email address receives an Outlook meeting invitation. The invitation includes the client's name, so check that it's appropriate to share it with every attendee you add, and add the client only if they should receive one. If sync isn't set up, attendees are recorded on the appointment but no invitation is sent.
Add Costs: service and travel costs
Adding costs is optional. Which costs you can add depends on the appointment type: if the type doesn't allow service costs or travel costs, you won't be able to add them. This step is still shown, so just click Save or Save & Close.
Costs are calculated from activities. Each activity has a rate, and the subtotal is the time multiplied by that rate. Activities are set up under Lists → Activities, see Activity List. For more about costs, see Add cost.
Adding a service cost
- Click Add Service Cost.
- Click + in Select Service Cost. The Add a Cost Description window lists the available activities with their charge codes and rates.
- Select an activity and click Select. The Subtotal is calculated from the appointment length. For example, a 30-minute appointment at $110.00 per hour is $55.00.
- Optionally, type a note in Case Cost Notes (up to 255 characters).
- Repeat for more service costs. To remove one, click its bin icon.
Adding travel
- Click + in Travel Time. The Travel Time panel shows the Destination, which is the address of the Location you chose in the previous step.
- Choose a Starting Location: one of your offices, or Previous Appointment to start from where your previous appointment that day was held.
- Choose the travel duration:
- Use auto-calculated duration: Case Manager works out the driving time and distance with Google Maps (for example, 13 min, 6 kms). Click the map pin to see the route in Google Maps. This option appears only if Google travel time is set up.
- A preset duration: 15 minutes, 30 minutes, 45 minutes, 1 hour, 1 hour 30 minutes or 2 hours.
- Click Save to return to the Add Costs step.
- Click + in Select Travel Cost, choose your travel activity and click Select. For example, 13 minutes at $220.00 per hour is $47.67.
- Optionally, add Case Cost Notes for the travel.
If the destination or starting location has no address, travel time can't be calculated automatically. Check whether the address is missing from the client or office record. Some appointments, such as telehealth, have no travel at all.
If the travel time doesn't meet the appointment type's rule
You can't save the appointment until you choose a duration that meets the travel rule for its appointment type:
- For a minimum rule, Case Manager shows "The duration is below the allowed minimum value of n minutes for the associated Appointment Type." Click OK and choose a longer duration.
- For a maximum rule, the Travel Time panel shows "The maximum allowable duration for this appointment type is n minutes." Choose a shorter duration.
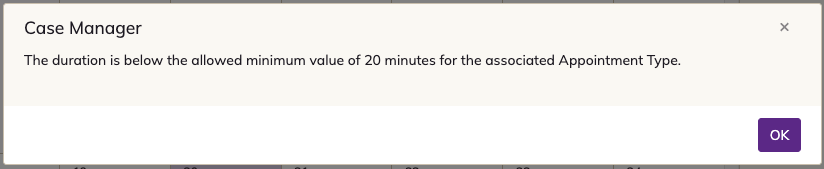
Travel time can only be the auto-calculated duration or one of the presets; it can't be typed in. If the auto-calculated time doesn't meet the rule, choose the nearest preset that does. For example, with a 20-minute minimum choose 30 minutes, and with a 20-minute maximum choose 15 minutes.
Saving the appointment
Total Cost adds up all the service and travel subtotals. If you don't have permission to see cost amounts, the amounts are hidden.
Click Save to save the appointment and keep it open, or Save & Close to save it and close the wizard.
After saving
The saved appointment opens in the appointment editor. The client's name becomes a link to their case, and the record shows who created it and when. Click Edit Costs to change the costs, or Delete to remove the appointment.
Changing and cancelling appointments
- To change an appointment, click it to open the editor, make your changes and click Save.
- In Agenda view, use the Confirm, Reschedule and Cancel buttons on each appointment.
- To cancel an appointment that has costs, Case Manager asks what to do with the costs. Whether they're refunded depends on the appointment type's cancellation policy.
- If Microsoft 365 calendar sync is on, changes and cancellations are copied to the assigned employee's Outlook calendar, see Microsoft 365 calendar sync.