
Invoice template options for Heading and Line Items
There are two groups of options to work with. As you will also see in Using the Report Designer, the fields that you select in each group of options will be placed in different parts of the invoice template and hence in different parts of an invoice.
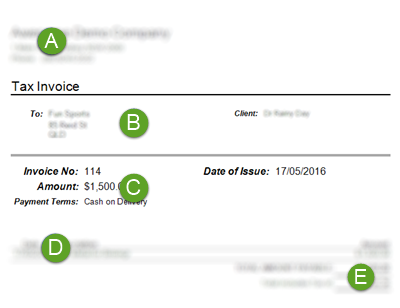
The invoice template is divided broadly into regions:
- Company details
- The invoice heading, containing the heading fields
- Invoice details and the payment terms for the invoice contact's company.
- Invoice line item(s)
- Details of the total amount of all line item(s)
Heading options
The options here are fairly self-explanatory. They come from the case details and from the details of the contact with the Client role and the invoice contact's details.
The standard invoice header provider number is derived from the case’s category. If you also select the checkbox for Use the case manager's provider number then you can display the provider number of the user who is the Assign To person for the case instead. See Provider numbers for details of how provider numbers are stored in the system.
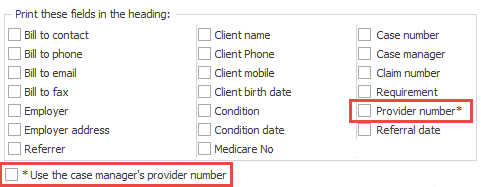
The options for heading fields that you see here will appear at the top of the invoice (B in the diagram above), underneath your company details.
This example selects only the Client name and uses the default layout template.

We see the client's name in the invoice heading:

Note that you may have selected a certain field, e.g. Medicare number, to be displayed in the invoice heading. If there is no defined value for that field in a case, the field is hidden in its invoices. You will not see a blank area next to the name of the field, as below.
![]()
Invoice Line Item options
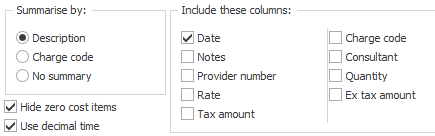
Here you specify how the invoice line items should be printed and the details that you want included. This appears at the bottom of the invoice (D in the diagram at the top of the page).
Each cost item included in an invoice can potentially generate a line item.
- Select one option to:
- summarise the line items by Description, i.e. the name of the cost
- summarise the line items by Charge code, or
- print each line item separately without summarising them.
- Select fields to specify the line item details you want to appear. The options available depend on what is selected at 1:
- Description summaries: you can display Date, Tax amount, Quantity, Ex tax amount
- Charge code summaries: you can display Date, Tax amount, Charge code, Quantity, Ex tax amount
- No summary: you can display all fields
- You can hide line items where the cost is $0 and specify that time is expressed as decimal values rather than hours and minutes.
Note that in a line item the Provider number refers to the provider number of the user linked to this cost. See Provider numbers for details of how this is stored in the system.

The example below summarises by Description, shows the Date and uses the default layout template.
We would see the line item(s) as:
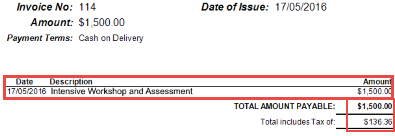
As you can also see above, the total amount payable and the tax included are shown at the bottom of the line items (this is indicated at E in the diagram at the top of the screen). This placement is specified in the Report Designer.