
Create journal entry
Once a transaction has been journaled it will usually be locked, depending on the value of a system setting, see Changes to journaled transactions for details.
The decision about when to create journal entries depends on your individual business and your accounting methods. For example:
- When you integrate invoices with systems outside Case Manager, the first step is usually to create a journal. This ensures that the invoices cannot subsequently be changed in Case Manager.
- Alternatively you could create a journal entry when invoice runs are completed, either weekly, fortnightly or monthly.
- A journal could be created at the end of your accounting period. You should create a journal entry for all invoice and adjustment transactions entered in that period.
- Every time you deposit cheques into your bank account you could create a journal entry containing the payment transactions for the cheques you banked.
- You could create separate journal entries for invoices (including adjustments) and payments if you need to perform separate transfers into accounting software
Create new journal entry
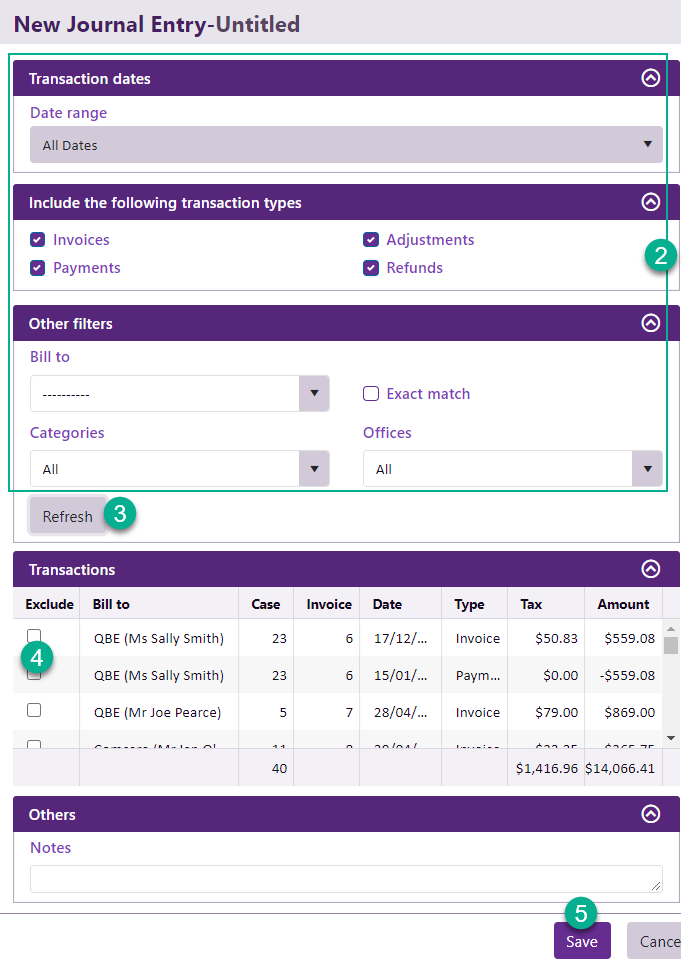
- At the top left hand side of the Journal Entry List, click the New button
 .
. - Specify the filter conditions for the transactions to be included. Naturally you can only select transactions that have not already been journaled.
- Click Refresh to display the transactions you have targeted.
You can specify a date range, type(s) of transactions and one or more categories and/or offices.
For example, to capture all invoices and adjustments created in the previous month select a date range of Last Month from the Range dropdown list and un-check the Payments and Refunds checkboxes.
You can also target transactions from individual companies.
Note that the dropdown list of Bill To companies is compiled from a survey of currently un-journaled transactions. However, there is a slight delay when the list is updated. For example, if you created an invoice for a company not currently in the list and wanted that company to appear straight away in the dropdown list, you’d need to log out and log back in to Case Manager to see the company appear. If that is not feasible, simply enter the company name in the Bill To field.
Note that if you make further changes to the filter conditions click Refresh again to display the targeted transactions.
- To exclude an individual transaction from the list, check its Exclude checkbox.
- When you are satisfied that the list is displaying the transactions you want included in the journal, click
The newly-created journal entry will be selected and displayed in the Journal Entry List.
The summary figures you may need to enter into your accounting package are displayed at the bottom of the journal: totals for invoices, payments and tax as appropriate.
Payments only
If you need to create a journal entry for payments only, at step 2 un-check all the transaction type checkboxes except Payments. Click Refresh and the list will only include payments. You may also need to specify a custom date range to exclude unwanted transactions, although with payments you are usually doing this when banking cheques so you want to include all payments to date.
If you find yourself entering a date range each time you create a new journal entry in order to exclude old transactions (entered merely for historical purposes), there is a better alternative. Create a special journal entry to capture those transactions. Enter information in its Notes field to communicate its purpose. Usually you would not transfer it to your accounting package.