
Invoice Generator
The Invoice Generator helps you quickly create a batch of invoices by guiding you through the steps involved.
- It starts by collecting and summarising all the unbilled costs in your system.
- You then select which of these costs you want to invoice.
- Next you review the invoices that would be generated and exclude any if desired.
- You then set details such as invoice date and whether you are creating draft or final invoices.
- Lastly, you generate the invoices.
You may choose to finish by printing the batch of invoices.
Alternatively, you can run the Invoice Batch Utility later, where you can perform actions such as printing or emailing invoices and converting draft invoices into finalised invoices.
Selecting the costs to be invoiced
In the Invoice Generator you specify criteria for the unbilled costs you want to be invoiced at Step 2 - invoice criteria.
You can restrict the costs to certain dates, companies, case categories, offices, teams and/or total values.
You can limit the batch to costs at cases marked Invoice Required. This can be reset at the end of the batch.
You can also limit the batch to costs at cases with a certain invoice group. This enables a system where you invoice cases with particular invoice groups at the same times each month and distribute both the workload and cash flow more evenly over the month. Create the set of groups at the Invoice Group List and assign an invoice group to a case at its Details tab (in the bottom section).
You can also exclude closed cases and/or those without a claim number.
And finally, you can include and/or exclude costs with certain charge codes.
Run invoice generator
To run the Invoice Generator select Tools > Invoice Generator from the main menu.
Step 1: unbilled costs
The first screen gives a summary of the unbilled costs that have been located in the system and alerts you to any potential problems. It displays the earliest and latest dates of the unbilled costs located and ready to be invoiced.
- By default the case contact with a Bill To role will be invoiced for the case cost(s).
You can change the case contact role to be billed by selecting from the dropdown list.
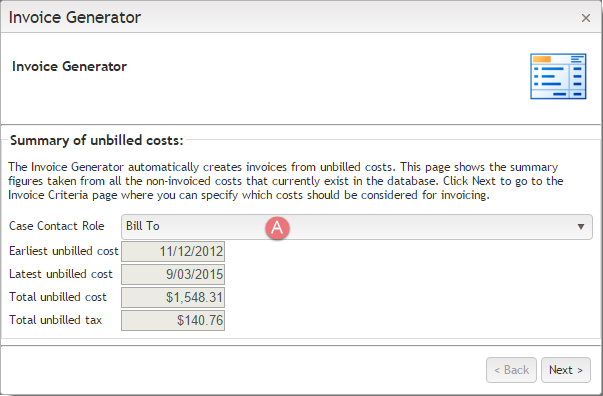
Note that it's impossible for the Invoice Generator to create an invoice for a particular case if none of the case contacts has the role specified at A (which is usually the Bill To role).
You will be informed when the generator cannot create a particular invoice and you can run the generator without correcting such problems. However, all cases without this contact role will simply be ignored. To solve such problems you can use the Case List Criteria to help you locate the cases, usually those without a Bill To contact. Simply add columns for Unbilled costs and Bill To contact details at the Case List, then filter and sort the list appropriately. This makes it easy to locate the problematic cases and go in and fix them.
Click Next >.
Step 2: invoice criteria
The next screen allows you to specify the invoices to be created by combining criteria for:
- cost dates
- a Bill To company
- one or more categories
- invoice groups
- invoice values
- one or more case offices
- one or more case teams
- charge code filters: you can include and/or exclude costs with certain codes
- invoices where the value is greater than a nominated amount
- cases marked as Invoice Required
- open cases
- cases with a claim number
You can create invoices that only contain costs created within a certain time period.
The invoice will have values for its From and End dates that match what you enter.

You can use the invoice date range feature in conjunction with a system setting to prevent entry of costs within existing invoices' date ranges.
See System accounting settings at D.
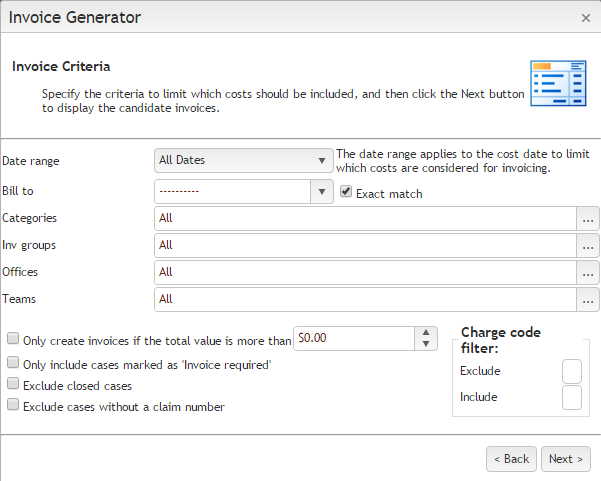
Click Next >.
Step 3: review invoices
The next screen displays a list of the invoices that could be created from costs matching your criteria.
If you do not want to create a potential invoice, click its Exclude check box.
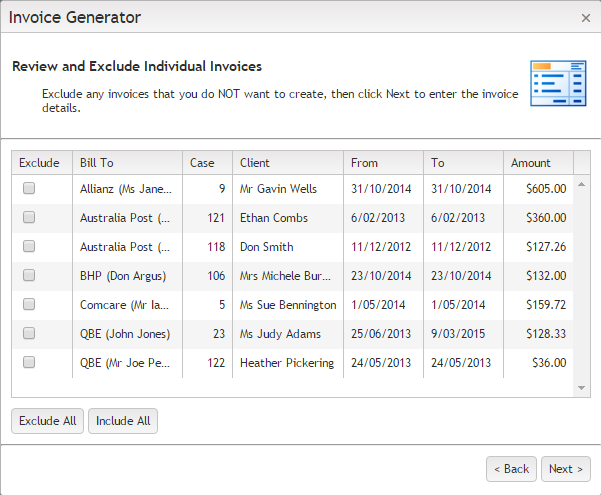
Click Next >.
Step 4: invoice details
Enter the desired details. After this step invoices will actually be created.
- You can create the invoices with a status of draft if you want staff to check them before finalising them.
- You can also choose to override what's entered in Terms when terms have been set for particular companies.
- You can choose whether to clear the Invoice Required setting for each case after the invoice has been created.
Enter other details to be added to all invoices in the batch:
- change the date if desired
- add a description
- add a note
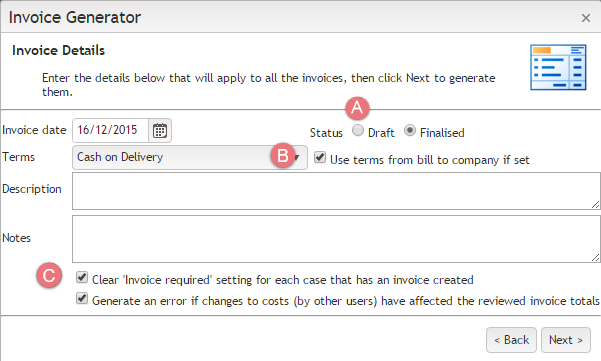
Click Next > to indicate that you want to create the invoices. There is one last confirmation window before they are created.
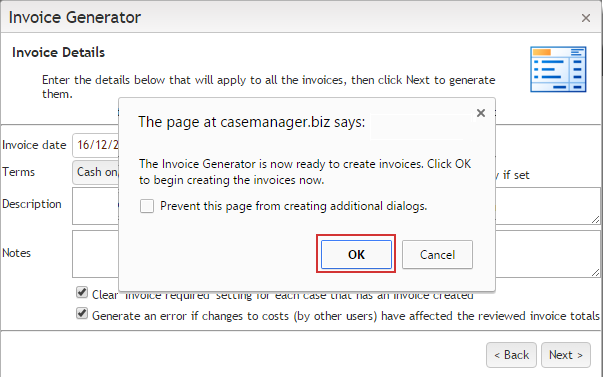
Click OK to confirm that you want to create the invoices.
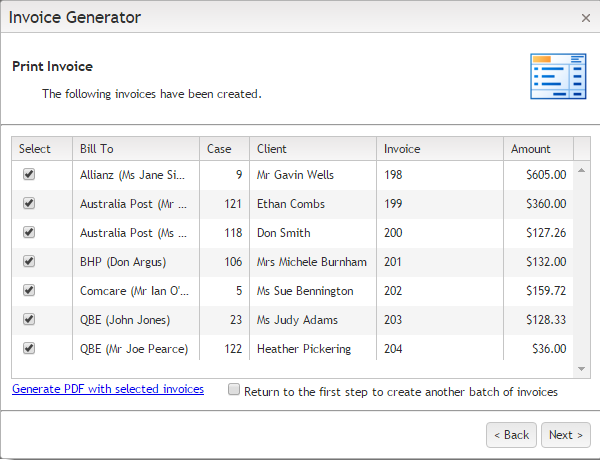
Step 5: result
To download a PDF file click the checkboxes for the required invoices and click Generate PDF with selected invoices. This downloads a file containing all selected invoices, which you can use to print them. Alternatively print and email the invoices later using the Invoice Batch Utility.
Click Next >.
Note that:
- when printing or creating a PDF file of an invoice, an invoice template for each invoice will be located and applied, as described here.
- you can also click the check box for Return to the first step to create another batch of invoices and click