
Office filtering
For large businesses with multiple offices you can choose to filter by office when:
- accessing and searching the Company List
- filtering information for analysis and reporting
By default office filtering is not turned on.
Turn on office filter
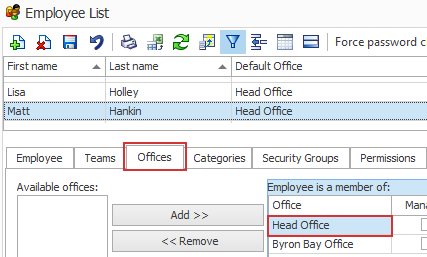
Office filtering shows only the companies and contacts that are allocated to the current user's primary office. This is the office that appears at the top of the list of offices that the user is a member of in the Employee List:
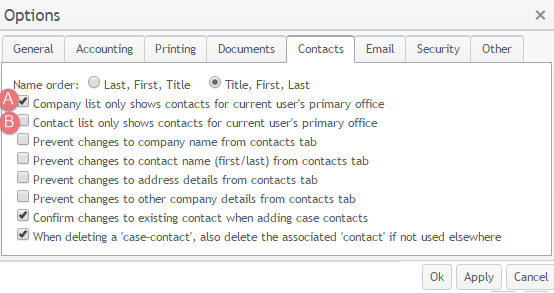
To turn on office filtering select Tools > Options then select the Contacts tab.
- Click the checkbox to turn on office filtering at the Company List.
- Click the checkbox to turn on office filtering for the list of contacts displayed when linking a new contact at the Contacts tab and when adding a new case.
At the Case List
By default the Case List now shows only cases for the office of the currently logged on user.
To see cases from other offices you can go to the Case List Criteria and select the offices whose cases you wish to view. You can also add the Office column to the grid.
At the Company List
By default a company is not allocated to any particular office. The Company List allows you to specifically allocate contacts to one of your offices with the Is office specific field, see Shared, unshared and unique contact fields.
The Company List Criteria enables you to filter the Company List by office and to add an Office column to the Company List grid.
When new contacts are added at the Company List the following occurs:
- If the contact is added to an existing location, or a new location for an existing company, the office will default to that of the existing record.
- If the contact is an entirely new company, location & contact, the office will be the default of the currently logged on user.
Office Filter and adding a new contact
When you are adding a new contact to a case you start by searching to see if the contact is already in the system. When the office filter is turned on you will only see the list of contacts from your office.
However, if another existing contact is required, you can expand the search to include contacts from all offices.
- Click the V icon to open the advanced search options.
- Click the Filter tab.
- Clear the Office filter by clicking Clear inside the office dropdown list.
The search results will now include all companies.
When a new contact is created at a case, they are saved to the Company List and the office will be the same as the case.