
Lifetime Care and Support cases
The screenshots on this page do not all reflect the new web version yet.
These cases require that you submit proposed costs in advance. You must have approval for these costs before you can provide services.
An approval or RP number is provided for a group of costs and this RP number needs to be included on invoice line items, along with the payment code for each service.
To manage this process in Case Manager, create one estimate for the case and add a new objective to it each time you receive a new RP number with an approved group of costs.
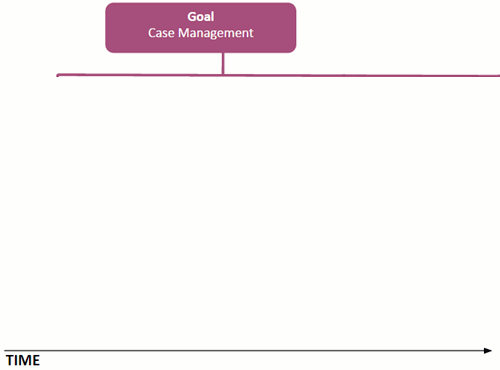
The animated diagram shows the estimate. Over time, you add new objectives, one for each approved group of costs. Each objective has one RP number and has estimate costs nested within it.
Each cost in an estimate objective has the same RP number at the end of its description. It is valid for a defined time period.
When you add costs to the case you select from the costs in the estimate. Each objective's costs are available to you so long as they are within date range and are not fully spent.
Your invoices will automatically display the correct RP number next to each line item.
To set up this system follow the instructions below to:
- create a special category
- create charge codes and activities
- create an estimate objective for each group of approved costs
Add a new category
Create a new category for these cases at the Category List.
Select Lists > Other Lists from the main menu.

Ensure Category is selected in List Type and click the  icon to create a new category.
In the new category's General section enter the Description and Shortcut.

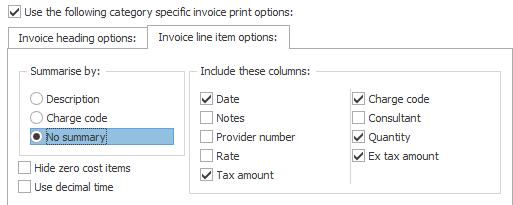
At the Invoice Printing section click Use the following category specific invoice print options and make sure that the following invoice line item options are set:
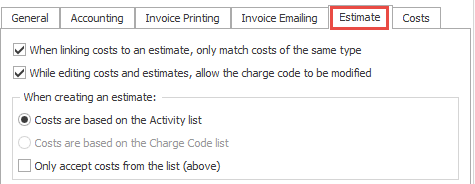
At the Estimate section click the checkboxes to:
- match cost types
- allow the charge code to be modified
Specify that costs in an estimate are based on the Activity List.
Uncheck the option to restrict the costs added to the estimate to members of this list.
At the Costs section select the options to:
- prevent costs being added without an estimate
- only allow costs from the estimate
Click the checkboxes to:
- prevent costs exceeding the estimate
- hide estimate costs when out of date range
This prevents you entering costs linked to an objective that are out of date.

Set up charge codes and activities
Select the list type: Charge Code and select the category Lifetime Care and Support.
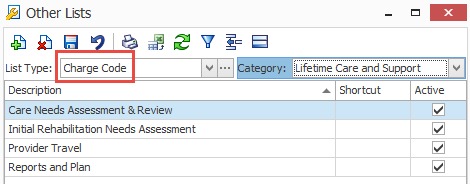
LTCS requires certain charge codes e.g. Initial Rehabilitation Needs Assessment LTCS101.
Add appropriate charge codes to the Charge Code List.
Next select the list type: Activity and again select the category Lifetime Care and Support.
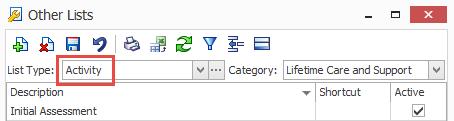
Add appropriate activities to the Activity List. Each one must be linked to an appropriate charge code, for example Initial Assessment - Case Manager is linked to charge code LTCS101.
Note that one charge code can be linked to multiple activities, i.e. a number of different case activities are 'collected' into one charge code.

For each Lifetime Care and Support case
Take note of the client's RP number and give the case the category of Lifetime Care and Support.
Create an estimate
Add an estimate to the case and give it a Description of Case Management. Do not set a Finish Date.
Add a new objective to the estimate for each approved group of costs
Add an objective to the case estimate.
- For best results leave the Objective field blank so that you do not create a new member of the Estimate Objectives List each time you enter a new objective.
- Enter the RP number in the Details field, e.g. RP 1234 56.
- It is helpful to add the dates of the approval unit to the Notes field.
You can see below that the RP number identifies the objective in the estimate.

Add costs to the objective
- Select a cost Description from the dropdown list and note its charge code and rate. Add the RP number at the end of the Description, e.g. Initial Assessment RP 1234 56.
- Enter the duration.
- Editing the Description has in effect created a new cost that is not linked to the same charge code as the original cost, so re-select the same charge code.
- The rate for this new cost will be set to the default rate, so re-enter the rate if required.
- Enter the approved Start and Finish dates.
- Save the estimate cost.

Note that above you added a brand new cost to the estimate but it is not saved in the Activity List. Thus, the Estimate Rate Adjuster will not be able to automatically update it should you later want to change your rates. Naturally you can adjust the rates manually.
Adding costs to the case and invoicing
Once an estimate objective has been set up, you can only add costs to the case that were specified in the objective. The costs in previous objectives are inactivated when they are out of date.
When you invoice for this case, the invoice line items show cost descriptions that include the RP number. They also display the charge codes.

FAQs
You can continue to bill against an objective until the cost's Finish date has passed or it has been fully spent. So you can bill to estimate costs in more than one objective if required.