
Before you start
Workflows are very powerful. Once put in place they operate automatically throughout your system.
Specify your requirements
You should start by asking yourself, What am I trying to achieve? This might seem easy to answer. However, it involves thinking about the individual steps in your workflow, the way they are related to each other and the way workflows and time operate in Case Manager.
Time and workflows - advanced concepts
First make sure that you understand how time is managed in workflows.
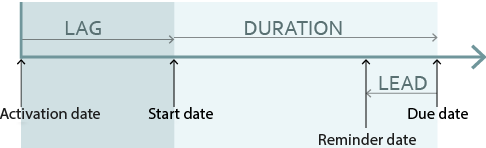
See Time and workflows for the basic details.
Then look at the sequence of two workflow steps below. Each step has a duration of 1 day. So the entire sequence is intended to be completed in 2 days.
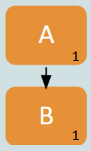
Be clear that there is nothing to force the entire sequence to be completed in 2 days. For example if the first task is completed late, the second task will start late too, which would be more than 1 day from the beginning. A user could complete the second task within its own duration, i.e. on time, but its completion date might still be more than 2 days from when the entire sequence started.
This is an important concept in workflow timing and is best illustrated with an example.
Example
In your Service Level Agreement you agree to do two things:
- The first task (A) must be done within 5 days of a reference date.
- The second task (B) must be done within 7 days of the reference date.
So in practice you would complete the first (A) within 5 days of the reference date, then do the second (B) in the next 2 days.
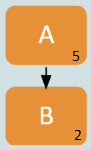
For the workflow you could set the duration for the first step to 5 days and the duration for the second to 2 days and link them like this:
To test your understanding, consider whether this is the best way to set up the steps.
No it's not.
The task generated by step A has a due date 5 days after the template activation date, which should be set to the reference date.
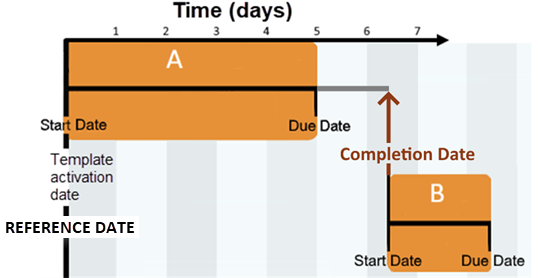
However the task generated by step B will not be created until task A has been completed. Assuming B has no lag, B's start date is A's completion date. Its due date will be 2 days later. This solution could be represented as:
There is no problem if task A is completed early (as above) or if it is completed by its due date.
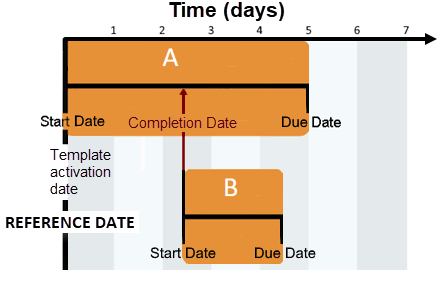
But if A is completed late, task B will start more than 5 days from the reference date and B's due date will be more than 7 days from the reference date, as seen below.
Thus, task B's dates have no direct link to the reference date. The task cannot direct the user to complete this task in accordance with the agreement.
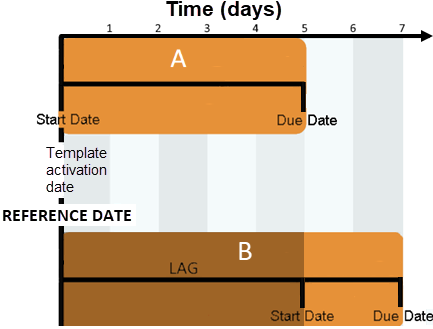
The solution is to organise the two steps as below:

The two tasks now have the same activation date, which is the template activation date. A is due 5 days after the trigger activation date (as before) and B is due 7 days after this same date.
If desired, you could give step B a lag of 5 days and a duration of 2 days. As a result task B's start date will be 5 days later than task A's start date, but its due date is still tied to the reference date.
Note that here task B will not be listed as a current task until 5 days have passed, because it only starts 5 days after the reference date.
Once you have mastered the concepts explained above, you can build structures from the basic building blocks seen at Workflow steps:
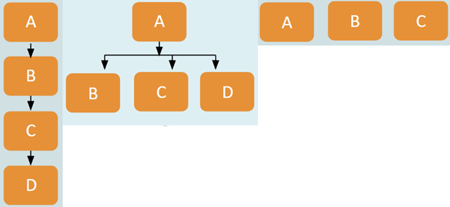
And don't forget that each step does not have to assigned to the same user, or even to one particular user. Steps can be assigned to a role, see Allocate tasks to roles.
Important tips for creating workflows
When you start creating workflows, some useful tips are:
- Rather than adding lots of steps, consider adding only one step and adding the task details to its Notes field.
- Use task reminders sparingly. If there are too many, users start to ignore them.
- If you can, experiment with workflow features on the demo database where you will not affect your live database.
- When you are learning, keep things extremely simple. Start with a bare minimum of functionality, for example one trigger plus one step, and test this.
- Add one thing at a time to this simple workflow template and then test. Thus, you add each new detail to a solid foundation, rather than adding lots of details at the same time, finding maybe that things are not working as you expected and then wondering which new element was responsible.
- When creating a new template, always check Suspended in its Details tab until you are ready to test it.
- You may choose to duplicate a template that has complex step structures before making major changes to its organisation. You can do this at the workflow grid.
- The layout of your steps can become quite complex and you can accidentally make destructive changes. Save your workflow diagram as you edit it, so that if necessary you can cancel the latest changes without losing everything you did in this session.
Set up tasks lists
Before creating workflow steps, make sure you have set up all the different tasks you need at the Task Title List.
Before implementing the workflow system, you should also check the Task Status List, the Task Late Completion Reason List and the Task Not Finished Reason List. Users may need to make selections from these lists when they manage the tasks your workflow generates.
You locate all these lists by going to the Other Lists menu and then selecting the required List type.