
Invoice Batch Utility
The screenshots on this page do not all reflect the new web version yet.
The Invoice Batch Utility is the last step in a batch invoicing process. It enables you to print and email invoices, delete them or reset the status of invoices from draft to finalised.
- You start by specifying a batch of invoices.
- You can then select only certain invoices in this batch.
- Next you review the invoices that remain in the batch and exclude any individual invoices if desired.
- Lastly, you specify what you want to do with these invoices: email them, print them, delete them, etc
Run invoice batch utility
Select this option via Tools > Invoice Batch Utility from the main menu.
Step 1 create invoice batch
Choose one of these option to choose the invoices for the batch:
- overdue invoices
- draft invoices
- an Invoice Generator batch
- invoices in a certain journal entry
- multiple invoices, identified by a number range
- multiple invoices, identified by a date range
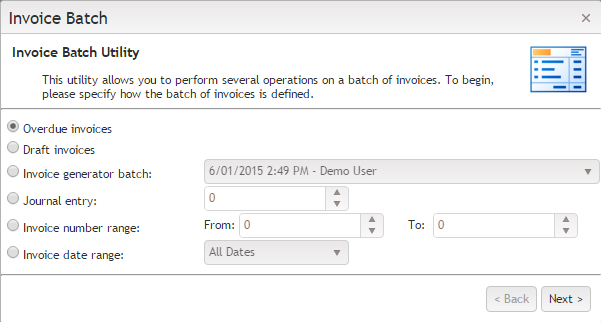
Click Next >.
Step 2 filter the batch
You can filter the batch with various Bill To contacts, categories, invoice groups, employees, offices and teams.
You can also:
- exclude closed cases
- exclude cases without a claim number
- exclude invoices that have been previously sent via email
- only include invoices issued more than a certain number of days ago
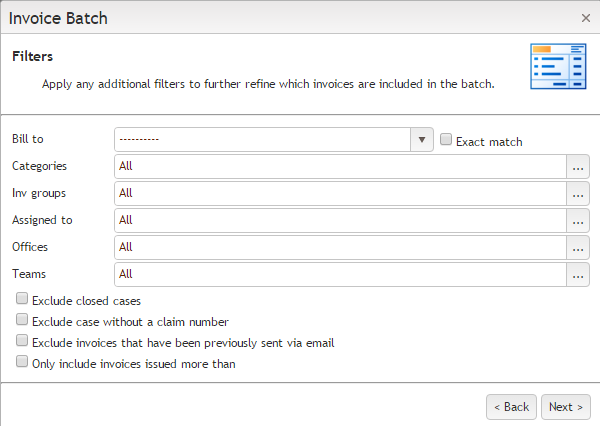
Click Next >.
Step 3 review the batch
In this step you review all the invoices included in the batch.
If you do not want to include an invoice, click its Exclude check box.
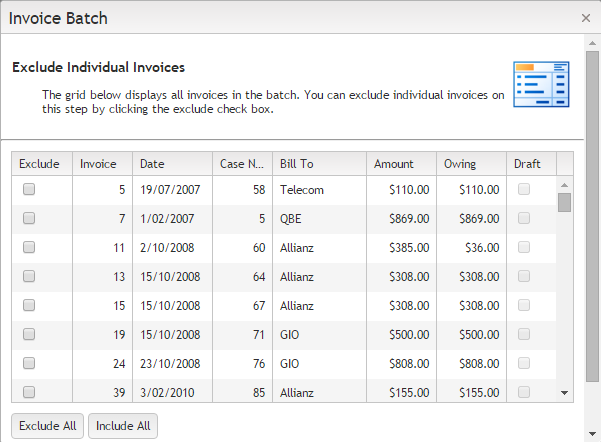
This list has a column chooser function. The screenshot shows columns for invoice number, date, case number, Bill To company, amount, amount owing and whether the invoice has draft status. You can also include columns for the Assign To user for the invoice's case.
Click Next >.
Step 4 choose batch output options
Choose whether you want to download the invoices as a PDF file, email them, set their invoice status or delete them.
Note that when printing or creating a PDF file of an invoice, an invoice template for each invoice will be located and applied, as described here.
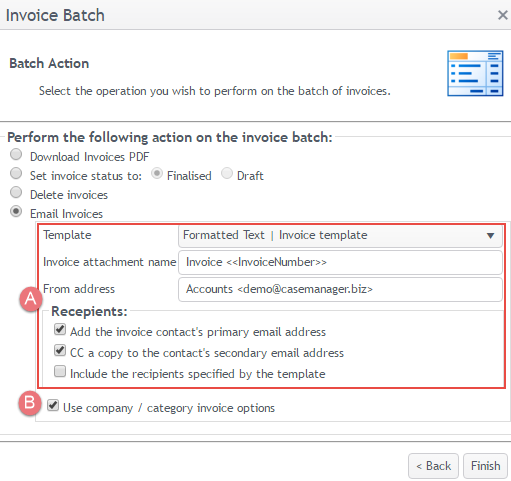
The downloaded PDF file contains all the invoices. You can use it to print them.
If you are emailing the invoices there are further options.
- The invoice email settings start off with the default values from the global invoice email settings. You can change them for this batch if desired.
- If the check box to use company/category invoice options is ticked, and the options specified for the invoice's company/case category do not include a template or a from address, the default values are used instead. The option to prompt for an email template does not apply here.
Click Finish.
You will be informed if there is no "To" address, or an invalid email address exists in any field.
If you are deleting or changing invoice status, a pop-up window asks you to confirm these irreversible requests.
Video demonstration of the Invoice Batch Utility.
Ad hoc invoice reports
You can also use the batch utility to provide quick ad hoc reports about invoices, although you can't save these.
For example you could create a batch of draft or overdue invoices that are within a certain date range and review the invoices at step 3.