Emails
Case emails are listed at the case's Documentation tab.
Case Manager is configured so that it sends emails using your outgoing email server. The set up details depend on which version of Case Manager you are running and what kind of email server you are using.
Once set up, you can send case emails by clicking the email icon. These can use templates and merge fields if required, see Send email.
Invoice emails are handled a little differently. You can send them in a batch or from a case's Account tab. These are also stored at the Documentation tab.
You receive incoming emails in your own email client (e.g. Outlook). You can add such an email to the appropriate case by dragging it onto the Documentation grid, with its attachments, see Drag email into Case Manager.
Thus, all case emails, both incoming and outgoing can be listed and accessible at the Documentation grid. See Email overview for full details.
Emails in the Documentation grid
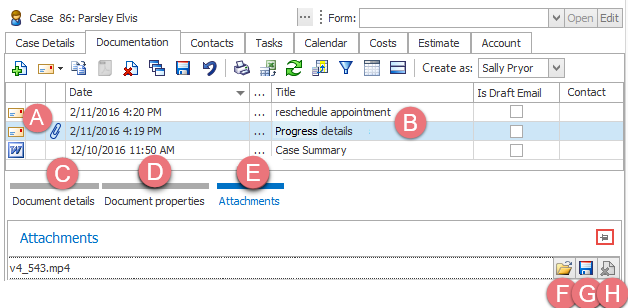
You can recognise emails in the documents grid.
- They are indicated by an email icon.
- The document's Title is the email subject line.
The paper clip indicates that the email has attachment(s).
When you select an email the bottom of the window shows all the email details.
- the email details
This is the same for all documents and includes the creation date and author. - the properties of the email, including the sender, recipient and when it was sent
- a list of any email attachments
When looking at the attachments there are extra icons:
- Click the icon to open the attachment.
- Click the icon to save the attachment to your own computer.
- Click the icon to delete the attachment.
When viewing the document details, properties or list of attachments, you can click the pin (highlighted) to make that information remain visible.
Columns
There are several useful email columns you can add using the column chooser:
- From address
- whether the email has attachments
- attachment size
- whether it is a draft email

