Move or merge a contact, location or company
This feature is currently unavailable in the web version of Case Manager. The instructions below apply only to the Windows version.
Contact information is shared between the Company List and individual cases, so that an update to a contact in one place updates the information in all cases where it is linked. This system is designed to make it easy for you to maintain easily accessible, up-to-date contact details, see Sharing contact information. The sharing of information means that you should make changes to contacts very carefully, distinguishing between changes that apply to a particular case or contact only, and changes that apply system-wide.
Before you make the changes described on this page it is important to read Change contact details to ensure that you are on the right track. Locate an example of the kind of change you want to make and follow the instructions.
Moving and merging
You can use the tools described on this page to:
- move contacts and locations in the Company List
- merge contacts, locations and companies in the Company List
You can move a contact to a different location (which may be in a different company).
You can move a location to a different company.
You can merge: a contact into another contact at the same company; a location into another location at the same company; or a company into another company.
The original contact/location/company is deleted.
All the existing case information related to the contact/location you are moving will be reconnected to the new location/company you are moving it to.
Similarly the case information related to the contact/location/company you are merging will be reconnected to the contact/location/company you are merging into.
For example, you move a contact from company A to a location in company B. If they are the Bill To contact for any cases, all the previous invoices they were linked to are now linked to company B, rather than to company A. You may not actually want this to happen. See Important note below for the approach to managing this.
You are clearly advised about the impact of your changes before the system performs these operations. Once you click YES the changes cannot be undone. We recommend that you experiment with this feature on the demo database to become familiar with it before applying it to your live data.
It is also a good idea to:
- Refresh your understanding of contacts who have a company with no name.
- Keep an audit record of the changes that you make.
Tip
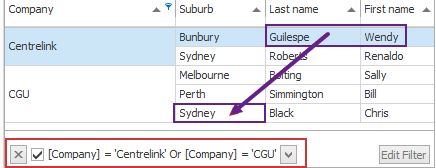
In the processes below you'll often need to display two particular rows in the Company List at the same time and drag items between them. This is easier to perform if they are displayed close together, which you can achieve with filtering. In the screenshot below it is easy to move Wendy Gillespie from Centrelink to CGU (Sydney office) because the list has been filtered appropriately.

Move contact
You can move a contact to a different location within the same company or to a location in a different company.
- Locate the contact name in the list then drag and drop it onto the desired location.
You will be asked to confirm that you want to proceed.
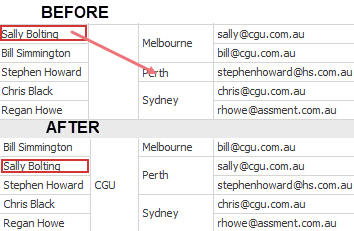
Below Sally Bolting was moved from CGU's Melbourne office to its Perth office by dragging her name onto the Perth location.

Move a contact to a new location in a company
This involves creating the new location first, then moving the contact to it:
- Select the company, click the
 icon and select the option to add a new contact and new location to the current company.
 - Enter the address details for the new location, enter DummyContact for the contact name and save them.
- Press the Refresh button to re-sort the list
- Drag the name of the contact you want to re-locate and drop it on the new location.
- Click the Refresh button to re-sort the list.
- Select the DummyContact contact record (created in second step) and click the delete button.
This is a little unnerving because it asks if you want to delete the company. However, if you have followed these instructions carefully you will only be deleting the blank contact.
The end result is that your contact is now the only contact at the new location in the company.
Move a location to a different company
- Locate the location in the list then drag and drop it on a different company.
You will be asked to confirm that you want to proceed.
This will add the original location to the new company. It will also move all the contacts at the original location to the same location at the new company. The original location will then be deleted. You may not want this, see Important note below.
Merge contacts
To merge two contacts within the same company:
- Locate the first contact in the list then drag and drop it onto the second contact.
All the case information related to the first contact will be reconnected to the second contact, the one you are merging it into. The first contact will then be deleted.
Merge locations
To merge two locations within the same company:
- Locate the first location in the list then drag and drop it onto the second location.
All the contacts (and hence, case information) for the first location will be reconnected to the second location, the one you merge into. The first location will then be deleted.
Merge companies
To merge two companies:
- Locate the first company in the list then drag and drop it onto the second company.
All the contacts (and hence, case information) and locations for the first company will be reconnected to the second company. The first company will then be deleted.
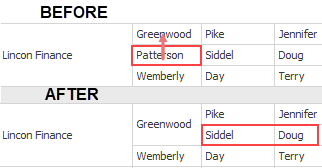
Below the Lincoln Finance's location of Patterson was merged into Greenwood by dragging its name onto the location. Doug Siddel is now connected to Greenwood.

Important note: managing the impact of move operations
As described above, when you have used these tools to move, for example, a contact to a different company, all the historical information related to this contact (such as costs and invoices) will be linked to the new company. Often you do not want this to happen.
You should consider simply creating a new contact record for the same person at the new company. As a result the person's connections in your database will be correctly separated between their work for the two companies. You should make the original contact inactive (un-tick the Contact active box), so that it remains in the system but cannot be selected at cases.
Similarly, when a contact has been moved to a different location, the new location details will apply everywhere this contact is connected to a case. If you do not want this, consider creating a new contact at the new location and similarly making the original one inactive.
See Contacts FAQ for some other scenarios.
