
Import invoices into Xero using its import function
The screenshots on this page do not all reflect the new web version yet.

This function uses the Xero import feature and has been replaced by the full Xero integration released in Case Manager V5.3. See Xero integration for full details.
The instructions for using the Xero invoice import function are detailed below. You are most likely to use this method when you wish to integrate Case Manager invoices and payments with multiple businesses.
In some circumstances you can set up payment integration in Xero so that payment information against imported invoices automatically returns to Case Manager.
See Multiple companies and Xero integration for details.
Import
You can import Case Manager invoices into Xero using its Import feature. This creates Xero invoices with a prefix of "CM-", complete with line item details and linked invoice numbers.
To do so, follow these steps:
- Create a journal entry that includes the required invoices.
- Use a custom report to export the journaled invoices to a CSV file.
- Import the CSV file into Xero to create draft invoices.
- Check and approve the draft invoices.
Full details of these steps are available below.
Note that you can only import invoices with this feature and you should enter adjustments manually, see Notes below.
Installation and setup
To use this function you first need to follow a simple setup procedure to create the Xero custom report using the windows version of Case Manager, see Setup Xero export. If you do not have access to this, email us at customer support and we can assist you.
Mapping of invoice information
The standard mapping in this process is summarised in the table, with further details below.
| Case Manager | Xero |
|
Invoice contact's company name |
Contact name |
|
Invoice number |
“CM-” plus invoice number |
|
Invoice terms |
Due date calculated from invoice terms |
|
Line item description: Activity |
Description Note that you can customise this, see Export options. |
|
Tax code: GST FRE [blank] other tax code |
GST on Income GST Free Income GST Free Income other tax code |
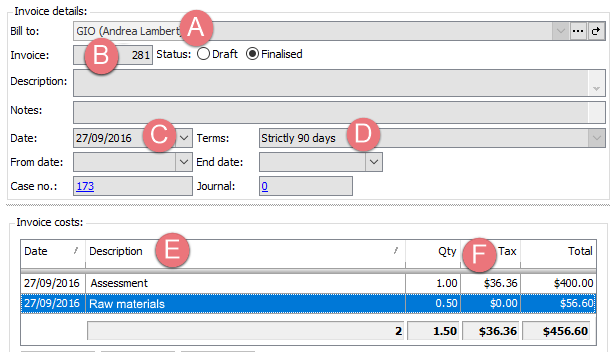
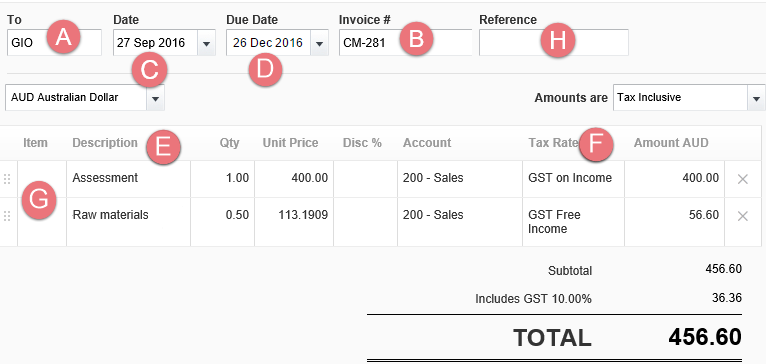
- Xero organises transactions by contact name. A Xero contact name is the equivalent of the invoice contact's company name in Case Manager.
- Case Manager invoice numbers are imported into Xero with CM added at the beginning. For example, invoice number 281 becomes invoice number CM - 281.
- The invoice date is the same for both.
- The Case Manager invoice's terms are used to set the due date for the Xero invoice.
- The standard export uses the cost's name to create the Xero line item description. You can customise this to also include the cost's date, notes and/or charge code, see Export options at F, G and J.
- The two standard Case Manager tax codes are converted into their Xero equivalents.
- If desired the Inventory item code can be set to the cost's charge code, see Export options at I.
Where the invoice contact's company has no name, the export uses the contact’s name. You can specify that the surname is first, see Export options at D.
Where an invoice line item has a blank tax code it will be exported as GST free.
When an invoice line item has another tax code, the name of this tax code is used in the export. Note that for the Xero import to calculate the correct line item tax amount, this tax code must be defined as a tax code in your Xero database.
Note also that you can choose not to export a cost's tax type, see Export options at E.
Below is an invoice in Case Manager:
After an export/import process, the equivalent invoice in Xero is:
The process
Step 1 create journal entry
When you create a journal entry, in effect you take a snapshot of transactions that also 'locks' them (see Changes to journaled transactions if further details are required).
Create a new journal entry and specify the invoices to include by date, category, and so on. Make sure that the journal only includes invoices:

Full instructions are available at create a journal entry.
Step 2 export invoice information
Select View > Reports from the main menu and click Export to Xero Journal (custom).
- Enter the journal number at Journal Entry.
- Click CSV File.
The default values for the remaining settings should apply to your export. You can change them if required and details are at Export options below.
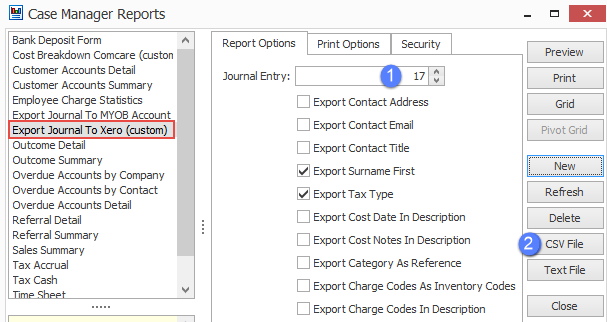
- You will be asked to provide a name and location for the CSV file.
- Click Save.
You can examine this file in Excel if you want, but it is not necessary.
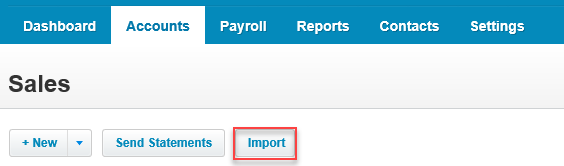
Step 3 import invoices into Xero
The import at Xero is performed via Accounts > Sales. Click Import to start the import.
- Select the Xero option
- You do not need to download their template file.
- Simply click Browse to locate the saved file from step 4 above.

- Leave this setting at No, ignore all address details.
- Select the Tax Inclusive option.
- Click Import to import the CSV file.
Xero displays the number of invoices being imported:
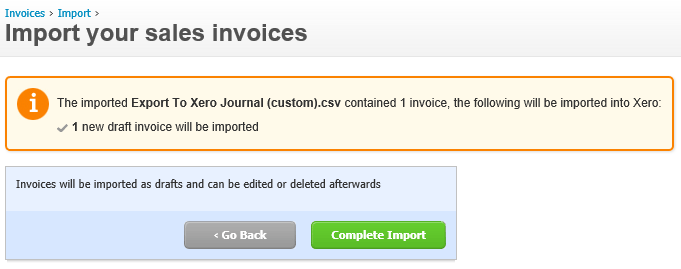
Click Complete Import to complete the import
The next screen shows the imported invoice(s) in the Draft folder.
Step 4 check and approve invoices
You can click the checkbox for the invoice(s) and click Approve to approve invoices in a batch.
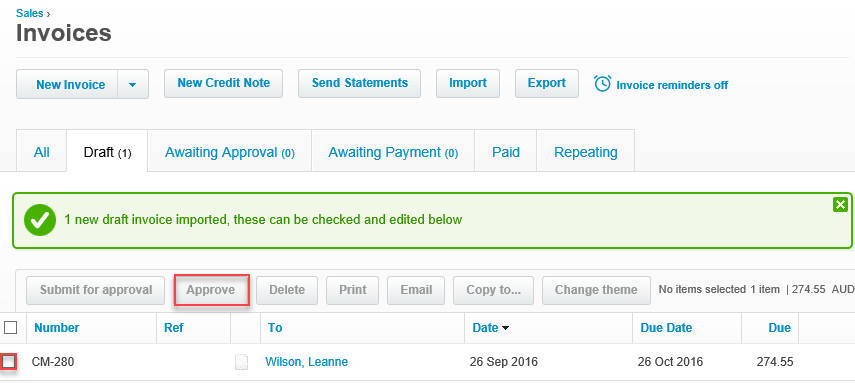
Alternatively, you can also click an invoice number to view it in detail, edit (if required) and approve it.
Once all the imported invoices are approved in Xero, the process is complete.
Export options
There are multiple options where you specify whether you want to include certain Case Manager information in the Xero import file. You should customise these to suit your own requirements when you first set things up. Note that users can change these values when they perform the export.
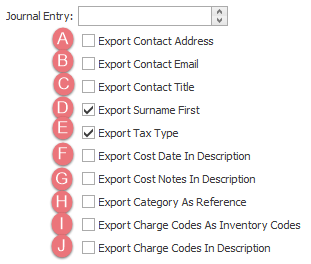
The options relate to the standard Xero import file columns and information in the Case Manager (CM) database. Be careful to set each option to either ticked, i.e. set, or empty, i.e. not set.
- If set the following columns contain CM information: POAddressLine1, POAddressLine2, POAddressLine3, POCity, PORegion, POPostalCode, POCountry. If not set, these columns will be empty.
- If set the EmailAddress column contains the contact's email address. If not set, this column will be empty.
-
If set the POAddressLine1 column will include the contact's title. If not set, this information will not be included.
- This settings apply only to costs where the invoice contact has a company with no name. If this is set the CompanyName column will contain the contact's surname followed by a comma and then their first name. If not set, the CompanyName column will contain the contact's first name followed by their surname.
-
If set the *TaxType column will contain the cost's tax type . If not set, the column will be empty.
-
If set the cost's date will be added to the Description column and hence, included in the line item's description.
- If set the cost's notes will be added to the Description column and hence, included in the line item's description.
-
If set the Reference column contains the case category. If not set, this column will be empty.
- If set the InventoryItemCode column contains the cost's charge code. If not set, this column will be empty.
- If set the charge code will be added to the Description column and hence, included in the line item's description.
General notes about the Xero export
- It's fairly safe to experiment while you learn to use this procedure because invoices are imported into Xero as draft invoices which you can delete easily. You can also examine the CSV import file before importing it into Xero.
- Do not re-order, re-name or remove columns in the CSV file because Xero will not be able to import this file correctly.
- Xero will not import invoice numbers that already exist in its system, so you cannot import the same journal twice.
- Make sure that the Case Manager company names are spelled the same as Xero’s contact names. If a name is spelled differently or if it doesn't already exist in the Xero system, Xero will assume it's a new contact and create it.
-
For the Xero import to calculate the correct line item tax amount for an invoice line item, this tax code must be defined as a tax code in your Xero database.
-
Xero transactions are organised into invoices (money owed to your business), bills (money your business owes) and credit notes (money owed to your business).
- Full Xero import information is at: https://help.xero.com/au/Accounts_InvoiceImport.
This export/import procedure cannot include Case Manager’s adjustments, payments or refunds because of a limitation in Xero’s import facility. In Case Manager each of these transactions is tied to an invoice. For Xero, an existing invoice number cannot appear in another import. Thus, adjustments, payments and refunds cannot be imported using the method detailed above.
It is recommended that when you create a journal containing invoices, you also create a separate, matching journal containing the adjustments for this period. You can edit existing invoices in Xero to correlate with these adjustments.
As for payments, in Xero you can allocate your bank account deposits directly to individual invoices. If you do this, you may choose to process payments completely in Xero, rather than in Case Manager. You can also enter payments in both Xero and Case Manager. Your choice depends on your business processes and the accounting method (cash/accruals) that you use.