
Medicare bulk bill claim

Case Manager enables you to bulk bill Medicare via the integrated claiming service provider.
With bulk billing you claim the full invoice amount from Medicare. When it is approved it is paid into your bank account.
Case Manager monitors the status of your claim and the outcome, including when it is paid into your account.
Make sure that the most important invoice requirements listed at Setting up for Medicare have been met before you submit a claim. You will be informed when your claim is missing other required information. You can add this at the appropriate place(s) in Case Manager and re-submit the claim.
The instructions below apply when you are creating a bulk bill claim. They also apply to patient paid claims, except obviously at step 4 where you select the type of claim.
Submit bulk bill claim
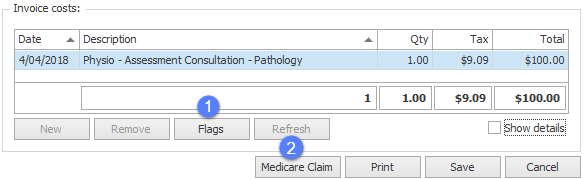
To submit a bulk bill claim for an invoice select it at the client's Account tab. Note that the invoice must have Finalised status.
Locate the bottom of the invoice line item cost details.
- If you know that additional service information will be required, set cost flag(s) in advance by selecting the cost and clicking Flags.
- Click Medicare Claim.
You will be offered different options for each service type, see Cost flags for details.
The Submit Medicare Claim window appears.
- You may choose to verify the client’s card before submission.
- Select the Bulk bill option.
If necessary you can click the row of dots (highlighted below) to open a window with the client's contact details and edit their Medicare number.
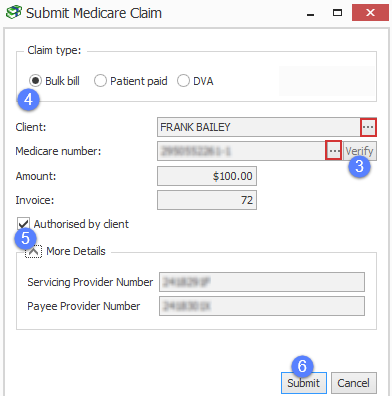
- You should leave Authorized by client ticked.
- Click Submit.
Claim validation and submission to Medicare
After you click Submit the claim is processed by Case Manager.
The first step is validating the claim details.
If your claim does not meet requirements you will be informed, for example:

In this situation click OK, correct the claim details (see notes about correcting errors below).
In the example above the claim can be easily corrected by setting cost flags.
Once the claim has been corrected click Submit again.
The following message indicates that your claim has now passed validation and Case Manager has sent it to Medicare.
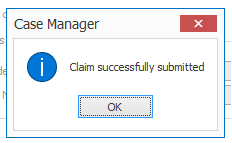
Click OK.
You will now see that the claim:
- has a Medicare Claim Id
- has a status of Pending Update

As the last step Medicare either accepts or rejects the claim. This does not happen straight away.
- You can click Check Status at any time to check if there are any updates from Medicare.
Note that you can also check the status of multiple claims at one time. See Check for updates to claims for full details.
There are two possible outcomes:
- Medicare accepts the claim and pays it.
- Medicare rejects the claim.
In Case Manager the claim is given Complete status and payment details are displayed.
In Case Manager the claim is given Failed status. The DVA error code and any additional notes are displayed.
See Claim life cycle for further details, including Medicare error codes.
If Medicare rejects your claim you may be able to correct the claim details and try again.
Correct the claim details
Case Manager claim validation checks whether your claim details are invalid and/or incomplete.
The most important claim details are explained at Setting up for Medicare/DVA. Note that if you need to change invoice details you will need to change the invoice status to Draft first.
For some services you are required to give extra details beyond the usual requirements, see Data mapping for an itemized list.
When the invoice's service type requires extra information you set cost flag(s) to supply this information.