
The Calendar
The system Calendar displays a filtered collection of appointments, including appointments that are not linked to a case. The Calendar can be displayed in a number of formats: as a list, as a timeline and in daily, weekly or monthly calendars.
You can create new appointments at the Calendar, including appointments that are not linked to a case.
Filter Calendar
The appointments displayed are those specified by the filters in the Appointment List Criteria. These settings are clearly indicated.
Employees can use these filters at the Calendar to display their own appointments. Managers can use them to display and manage appointments for all their employees.
The filters can also be used to manage employee availability at the Calendar.
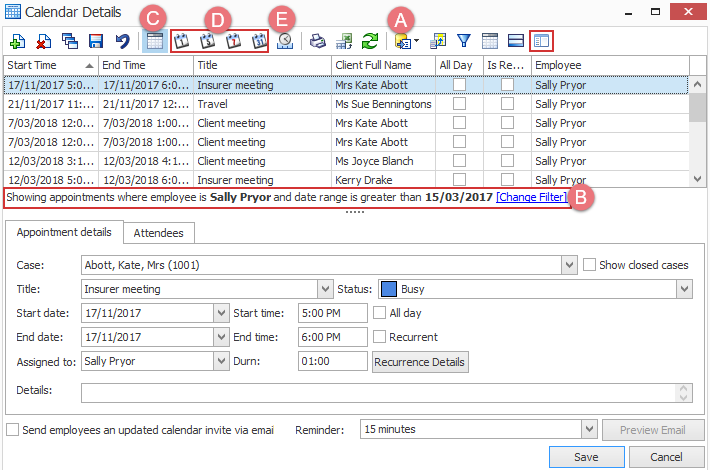
- Click the
 icon to open the Appointment List Criteria and set the specifications for the filters, see Appointment List Criteria.
 - The current filter settings are displayed.
Note that when you view the appointments as a grid you can use the standard grid filter to further filter the list of appointments.
You can display the appointments in several ways:
- When you select the appointment grid view, the calendar displays a list of appointments, as shown in the screenshot above. The details of an appointment can be displayed at the bottom, as seen here, or to the right. Click the icon at the RHS (highlighted above) to change this.
- Alternatively you can view the appointments in daily, weekly (work week or full week) or monthly calendars, see below.
- You can also display a timeline view of the appointments.
This list has tools to help you sort, total and further filter the appointments that have been selected by the Appointment List Criteria (A).
As is seen below, for all but the grid view format:
- the left hand side of the screen displays a standard date calendar
- the right hand side displays the daily, weekly, monthly or timeline calendar
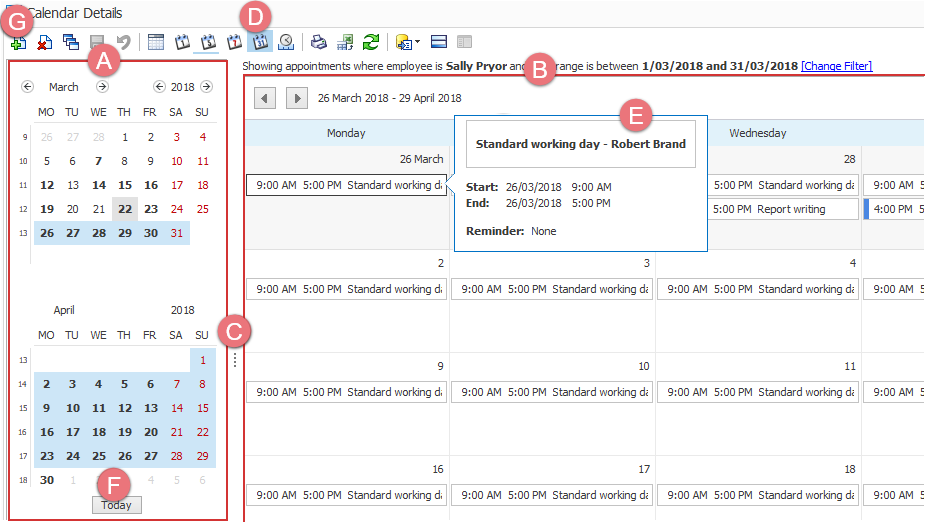
- the splitter between the two sides can be moved to expand the amount of information displayed on each side
- The calendar format is indicated (daily weekly, etc).
- When you hover the cursor over an appointment further details are displayed, including the assigned employee and the case (if appointment is linked to a case}.
- Click Today to locate today's date in the calendar.
You can quickly switch between formats to display different time periods and different amounts of detail.
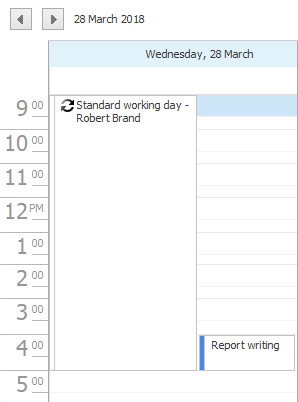
For example Wednesday 28 March shown above in monthly view has more detail in the single day view:
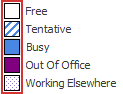
Note that the  icon indicates a recurrent appointment and that appointments are colour coded at the left using visual patterns to indicate appointment status:
Double-click the appointment to open the appointment details window.
Add appointment
- Click the
 icon to create new appointments at this screen.
The process is very similar to creating appointments at a case's Calendar tab, except that you can select a case or else create an appointment that is not linked to a case.
Older video demonstration of the Calendar.