
Add case
When a new client is referred for case management you need to create a new case for them.
The process of adding a new case is simple. The only mandatory fields that you have to enter are the client's first and last name and the Case category. You should carefully consider the category that you select for a new case.
A case number is automatically assigned to the case, which you can change as long as your new case number is not already in the system.
The case starts with one contact, i.e. the client
All other details can be entered after the case has been created. For example, the other contacts - the employer, the contact paying the bill, the treating doctor, etc - can be entered at the Contacts grid tab. Similarly case details, documentation, tasks, etc can be added though the appropriate tabs.
Note that if your system has been set up with workflows and a new case trigger has been specified with the case category that you chose, case tasks may also be generated when you create the case. These direct you how to handle the new case, see Overview of Workflows for details.
Add a new case
To add the new case click the New Case icon  at the top of the Case List grid (top left hand side of the screen).
This starts the New Case wizard. The first step is to search your system to see whether the client is already in the database.
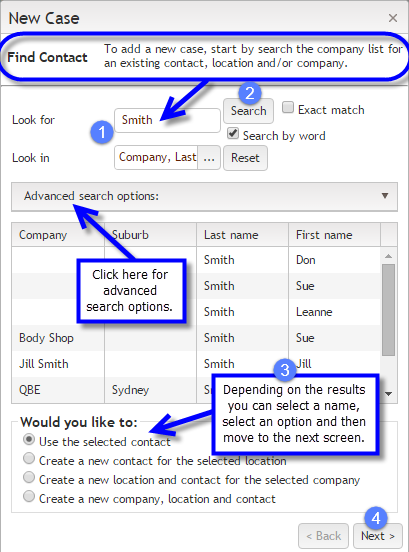
The process is essentially the same as adding a contact to an existing case:
- Enter the name.
- Click Search.
- If the client is not in the system select the option to create a new contact, location and company.
- Click Next.
Here it is the client’s name.
See the note below.
The search options that you can utilise here are very customisable and sophisticated. You can perform extremely targeted searches. Depending on the size and complexity of your business you should take advantage of these. Full details are at Find contact/company - search options.
Note that usually the client's company name is left blank and the Case List will show the client's name in the Client column. If you enter a company name for the client, the Case List will display the company name in the Client column, rather than the client's name.
Occasionally a client's blank company name is used to store settings. See Contacts with no company name if further information is required.
Client details
The next step is to add details about the client.
The contact information includes address, phone and email. Other details include employment (position, department), birth date, gender, medicare number and contact notes.
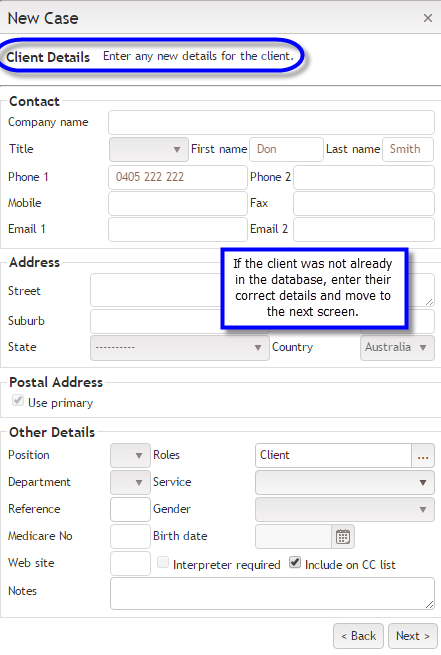
Click Next > to go to the final step where you enter case details.
Case details
The fields here are the same as are found in each Case Details tab. See Case information for full information.
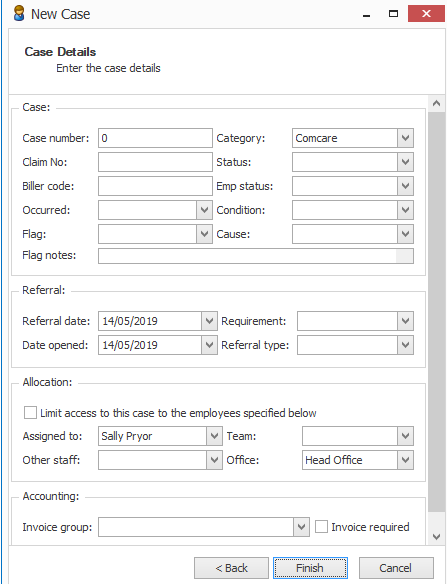
As mentioned above:
- You can enter a case number if you need a specific number assigned to the new case. Otherwise leave this number set to 0 and the next available number will be automatically allocated when the new case is saved.
- The category of the case is the only compulsory field and you should choose this carefully.
- You do not have to enter values for the other fields now. You can do this once the case has been created.
To complete the creation of the new case click Finish.
Video demonstration of adding a new case.