Add contact to a case
All contacts in a Case Manager system are stored in a master contact list, the Company List.
Each contact has a location and is linked through the location to a company.
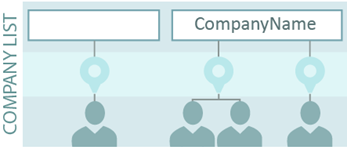
Typically, your clients have a company with no name. This enables you to set company settings for the client if required.
When you add a contact to a case you are actually connecting the case to a contact in the Company List.
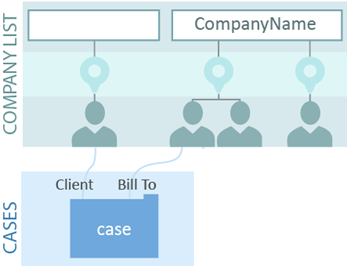
You give the contact one or more contact roles in the case.
This system enables contact information to be shared between the Company List and cases. Thus, an update in the Company List updates the details for this contact at each case they are connected to.
Details are at Sharing contact information.
Note that you should make any contact changes carefully, distinguishing between changes that apply to this case only, to this contact only and changes that apply system-wide, as explained at Change contact details and Reorganise a contact or company.
To start the process of adding a customer to a case click the New icon ![]() at the case's Contacts tab.
at the case's Contacts tab.
As outlined above, you are actually connecting a contact to the case.
This may be someone who is already in the Company List or it may be someone new that you also add to the Company List.
Step 1 - search for contact
So the first step is to check whether the contact and/or their company already exists in the Company List. This protects the integrity of your system so that you don't end up with multiple records for the same contact. It also enables the sharing of contact information, as outlined above.
Follow the search instructions below at Find contact/company - search options (below) to search for the contact and/or company. You can perform extremely targeted searches, including excluding inactive contacts, locations and companies.
- The results of your search are displayed in a list.
Step 2 - select/add contact
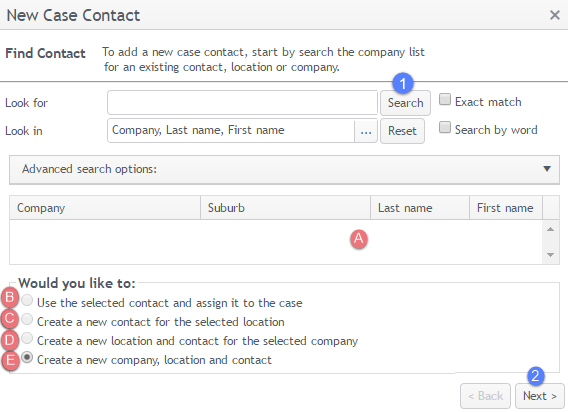
- You can choose to:
- connect an existing contact already in the Company List
- add a new contact to an existing location at an existing company and link it to the case
- add a new contact to a new location in an existing company and link it to the case
- add a new contact (with location and company) to the Company List and link it to the case
You select this contact from the list of search results.
Alternatively you can choose to:
You select the existing company and location from the list of search results.
You select the existing company from the list of search results.
You do not select anything from the list of search results.
In the subsequent screen you enter all the contact details and behind the scenes, Case Manager adds a new contact to the Company List before connecting this new contact to the case.
- Clicking Next > takes you to the contact details screen (details below) where you either view or add contact information.
Thus, when you add an existing contact to a case, all their details are automatically connected to the case. When you create and connect a new contact their details are similarly added to the case. And the new contact is automatically added to the Company List.
To search the Company List for an existing contact, location or company when adding contacts to cases:
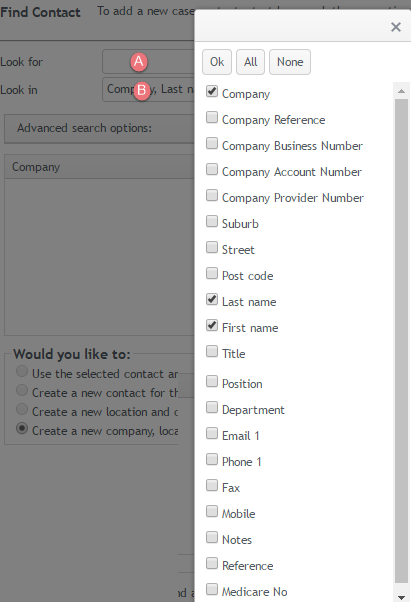
- Enter the search text at Look for:
- Click one or more checkboxes in Look in: and click OK.
- When the Exact match checkbox is ticked an exact match with at least one of the search fields is searched for, e.g. to look for Smith the search text needs to be Smith.
- The Search by word checkbox applies when you enter multiple words in your search text. If clicked you will search for each word separately.
- Click Search to initiate the search.
If this is not checked, the search text only needs to located somewhere, so Smith could be located using a search text of smi or mit. However the list of search results would be much longer.
If this is not checked, you will search for the entire text, which is more restrictive and returns a shorter list of results.
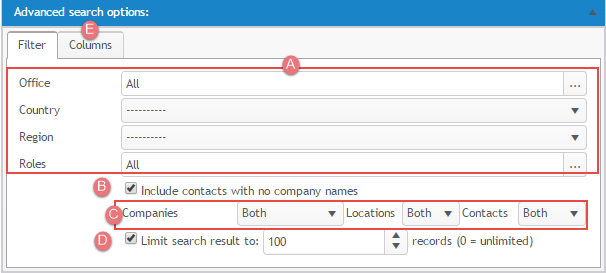
Advanced search options
You can
These comprise:
- Filtering by office, country, region and role
- Including or excluding contacts with no company name (these are usually clients)
- Including or excluding active/inactive contacts, locations and companies
- Limiting the search results
- Specifying the information displayed about the search results
The first allows you to search for contacts where the company has the Is office specific field set to a certain value. The next two refer to address details.
The last allows you to, for example, leave the search text (Look for:) empty and search for all the contacts who have an employer role in cases.
A contact must match the three settings in order to be displayed.
For example, if the settings are: active company, active or inactive location and active contact, an active contact will not be displayed if its company is inactive. You are excluding inactive companies so you will not see any of their contacts, even if the contacts are active.
Notes
- Check boxes have three possible values: checked (with a tick), unchecked (empty) and undefined (with a black, filled square).
- After you set values for the advanced settings and continue all the way to adding a contact to the case, these settings are remembered for next time. If you cancel the process mid way, the settings are not retained.
Most contact fields are self-explanatory and appear in both the Contacts tab and the Company List.
There are several fields that are unique to each of these. And there are two fields whose values are not shared between them (Notes and Reference). See Shared, unshared and unique contact fields for full details.
Notes
- It is important to remember that contact information is shared between the Company List and individual cases, so that an update to a contact in one place (e.g. a new street address entered at the Company List) updates the information in all cases where it is linked.
- This means that if you need to move a contact from their existing office, you should not do this by updating the contact's details because your changes will apply everywhere that office appears in the system. See Change contact details for full details.
- A third gender option is now available for people who identify as being neither exclusively male or exclusively female. Case Manager has an unspecified gender option and this is appropriately managed when merge fields such as his/her are used in document templates, see Gender and merge fields.
Conversely, a new phone number entered for the contact at the Contacts tab updates the contact's phone number in the Company List and in all other cases where the contact is linked. This is subject to what you have specified at your system-wide contacts settings and there are some exceptions, see Shared, unshared and unique contact fields .
- Creating a new contact at a case's Contacts tab is the same as adding a new contact at the Company List. However you cannot enter most company information at the Contacts tab, such as company rates and invoice options. You can enter the company's website and provider number.
Click Finish to save any new information and link this contact to the case.
