System Email Server Configuration for Version 6.2
Email configuration in Case Manager has changed with the release of version 6.3 due to a shift towards Modern Authentication.
This page contains the appropriate configuration information when you are running previous releases of Case Manager, such as Version 6.2 or earlier.
Case Manager sends email via your outgoing mail server(s). This must be configured before you can send emails and should be performed by the system administrator. They need to work with the IT people who set up your email system outside Case Manager.
To access system email settings select Tools > Options from the main menu then click the Email tab. There are three tabs at the system email options: the Outgoing Mail server tab (below), the Global Signature tab (see Email signatures) and the Other tab (see System email settings).
This page covers:
- configuration of the system-wide outgoing mail server, and
- setting up the Case Manager System email.
Click the Outgoing Mail Server tab.
Outgoing Mail Server
Case Manager sends emails via your own email server. Usually you need to configure the system outgoing mail server and its authentication details to enable email to be sent from Case Manager. This varies depending on the way your company email is set up. The authentication settings must be configured for Case Manager to send emails, such as Forgotten Password emails.
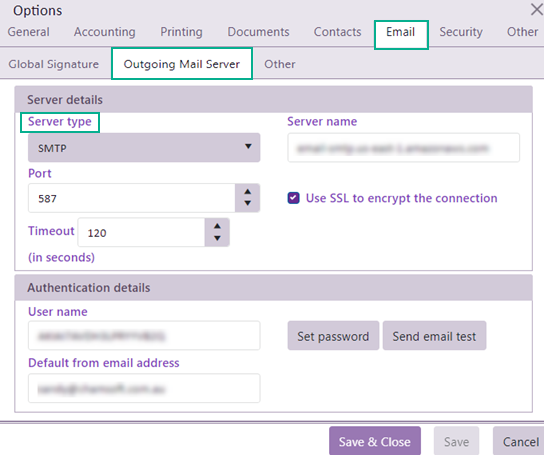
Server details
Enter the system server details. Your IT person should be able to supply this information, or the person who set up your business email system.
Server type
- For a Simple Mail Transfer Protocol (SMTP) server you need to enter the Server name, Port number, Timeout and whether SSL is used for encryption.
- When the server type is EWS the mail server settings must be configured for every employee/user separately in their customised server settings so that their Outlook usernames and passwords can also be entered
We recommend that you set the Port to the secure port, 587, and that the SSL option is turned on.
The next step is to add the Authentication details (below) that enable access to this server.
These can be entered at the Employee List or at the user's User Options, see Exchange Web Services.
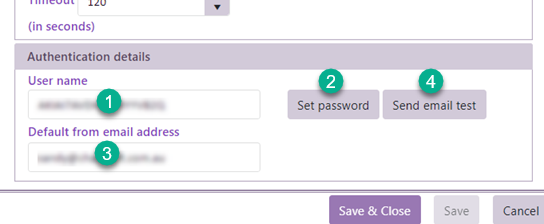
Authentication details
These are the email address and password for an authenticated user. They enable Case Manager to access this outgoing mail server.
- Enter the email address of the authenticated user in User name.
- Enter their password.
- Usually you can leave the default from address blank, as the address at 1 is used.
However, if you use a different sub address, you can enter it here.
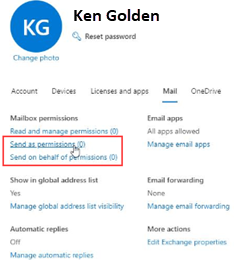
Note that if you enter a different address here this address must have permission to send emails as the authenticated user. This is set outside Case Manager.
For example, in Microsoft 365 you can give mailbox permissions to another user or allow them to send email on behalf of you. See details in the second error below.
 BML
BML
- Click Send email test to send an email to yourself and confirm that everything functions correctly.
It will be sent from the global email address to your email address, as listed in the Employee List.
If the test fails see the details below.
Case Manager System Email
This is used when Case Manager needs to send emails, such as with forgotten passwords and SMS reply notifications. It is the address of the Authenticated user above.
If you selected a separate address at 3 above and it has the permission described, the Case Manager system email is this address.
If your test fails:
User Email Address
Firstly, for this test to succeed it needs to have somewhere to send the email. You are logged in to Case Manager through your user account and this account must have an email address at its Employee List record.
Status 401: Unauthorized

When the error message is Status 401: Unauthorized, the issue is usually that the password entered here does not match the password used for your email account outside of Case Manager.
Error Send As Denied
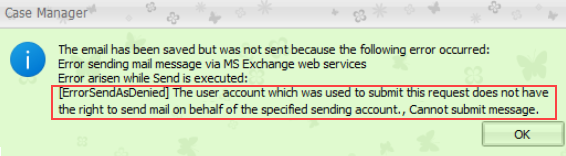
The email address of the user account that you are logged in to Case Manager needs to have permission to send mail as the authenticated user. This permission needs to be set up for your email account outside of Case Manager. Please see notes below.
Note 1
In version 6.2 and earlier, when you send a test email Case Manager:
- Constructs a test email where the 'From' and 'To' address is set to be the email address of the signed in user.
- Case Manager then logs into your email service using the Authenticated User settings.
- From there the email content is relayed to your email service.
- Your email service then sends the test email.
If the signed in user has their own Outgoing Mail Server Settings then they are the Authenticated User in this test.
Note 2
In version 6.3 and later:
- When using SMTP servers, the test email scenario above applies
However, if the system's Authenticated User email address is not your own email address, you need to have permission to 'Send As' that user for this test to succeed. This applies to all versions of Case Manager.
This permission lets you, the signed in Case Manager user, send emails as the Authenticated User.
The permission for this is configured outside Case Manager (usually by your IT) in the authenticated user's email server settings.
For example, in Microsoft 365 an account can give mailbox permissions to another user or allow them to send email on behalf of them: