ReturnToWorkSA integration
The screenshots on this page do not all reflect the new web version yet.

Invoices for ReturnToWorkSA
- have particular requirements for time recording
- can be electronically exported from Case Manager and imported into the ReturnToWorkSA system
Time recording and charge code rounding
ReturnToWorkSA requires that when activities are invoiced their duration per charge code per day must be a multiple of 6 minutes. The idea is that short activities, such as quick phone calls, can be combined together with equivalent activities into multiples of 6 minute units.
This requirement is supported by Case Manager. The system performs the rounding calculation when creating invoices for all cases with a category where Use ReturnToWorkSA charge code rounding is selected.
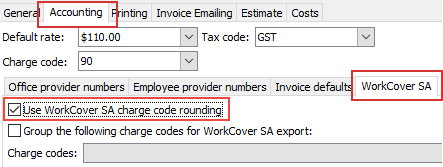
This setting is at the Accounting tab of the Category settings.
More information about the rounding function is at ReturnToWorkSA charge code rounding.
Export invoices from Case Manager to ReturnToWorkSA
ReturnToWorkSA invoices can be electronically exported from Case Manager and imported into the ReturnToWorkSA system.
The first step is to create the required invoices. For more information about invoicing see Invoices.
The export-import process has three steps:
- Create a journal entry containing these invoices
- Create an export file from the journal entry
- Import the file into the ReturnToWorkSA system
If you have multiple offices involved with ReturnToWorkSA invoices, you need to perform one export-import process per office.
Export fields
The export file has one header and multiple detail records, one for each cost in the invoices.
The table below show the Case Manager fields included in the header.
| Case Manager field | Required | ReturnToWorkSA export field |
|
Company name (Set in the system options) |
Yes | Practice name |
|
Primary address of the selected office (see step 13 below) |
Yes | Practice address |
|
Business Number of the selected office |
Yes | ABN |
The table below shows the Case Manager fields included in the export detail records.
| Case Manager field | Required | ReturnToWorkSA export field |
| Invoice number | Yes | Invoice number |
| Invoice date | Yes | Invoice date |
| Claim No | Yes | Claim number |
| Cost's employee provider number, see Provider numbers for more information | Yes | Service provider number |
| Cost's date | Yes | Service from date |
| Cost's start time | No | Service from time |
| Cost's charge code | Yes | Service type code |
| Cost's description | Yes | Service description |
| Cost's unit charge amount | Yes | Rate |
|
For activities - cost's duration in minutes For items and fixed charge - cost's quantity |
Yes | Quantity |
|
For activities - M (minutes) For items and fixed charge - U (units) |
No | Unit of measurement |
| Cost's total charge | Yes | Total |
| Tax status: gst inclusive or no tax | Yes | Y if cost has GST included |
Notes
- Required means a value must be supplied and if it is missing the import file will not be processed at ReturnToWorkSA. For example, every cost must have a charge code.
- If Case Manager identifies an error when exporting information for any invoice in the batch (e.g. the charge code is missing for a cost), you will be informed (step 16) so that you can correct it.
- You are prevented from importing the same export file more than once into the ReturnToWorkSA system.
Export-import process
Details of the three steps of the invoice export-import process are below.
Create Journal Entry
- Go to View > Journal Entry List.
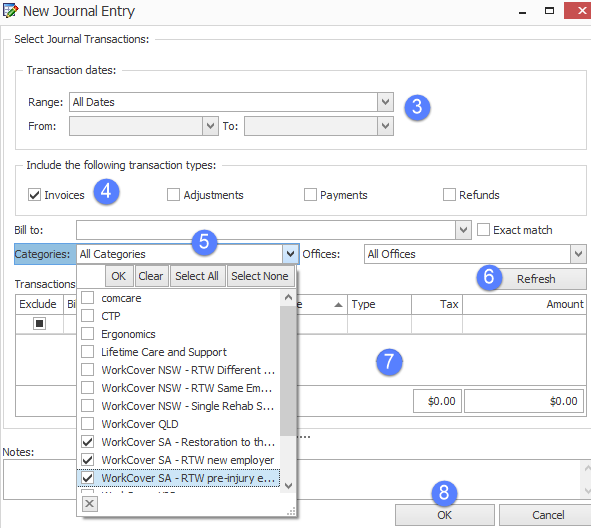
- At the top left hand side of the Journal Entry List, click the New button
 to add a new Journal Entry.
 - Select the required date range.
- Select the Invoices checkbox only.
- Select only the categories that are relevant to ReturnToWorkSA.
- Click Refresh.
- Review the list of invoices to ensure they are correct.
- Click OK.
Alternatively, you might filter invoices by the relevant Bill To companies. The choice depends on the way your business is set up in Case Manager.
For more information see Journal entries.
Create export file from journal entry
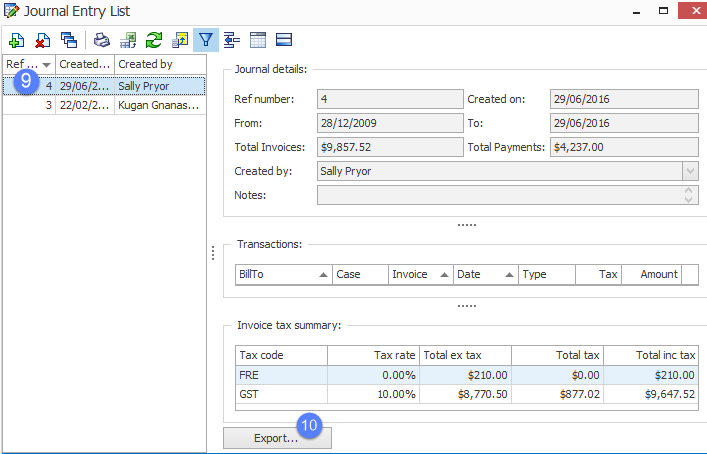
- Select the newly-created journal in the left hand pane.
- Click Export.
- Select WorkCover South Australia.
- Click Next.
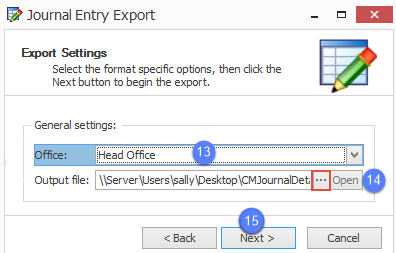
- Select an Office.
- Confirm that the output location for the file is appropriate.
- Click Next.
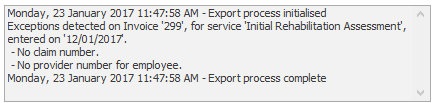
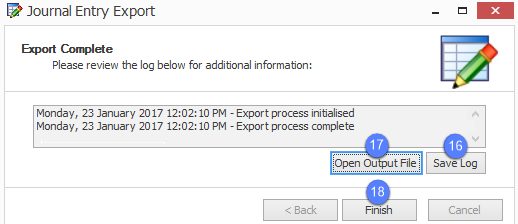
- The export file has been created and the export log is displayed in the window. Any errors are displayed:
- You can click Open Output File to display the export file created.
- Click Finish.
- If issues were reported in the log, correct them in the system and re-generate the export file by returning to step 10.

You can change the location of the export file by clicking ...
You can click Save Log to save the log to a file.
Note that when errors are displayed in the log the export file will still be created. However, this file will fail when it is imported into the ReturnToWorkSA system. If errors are reported in the log you need to rectify them and return to step 10 to create a new export file.
Import file at ReturnToWorkSA website
Currently you import the file in test mode first to ensure that there are no errors. The instructions below explain the steps. If there are any errors the entire file is rejected.
The test mode will be eliminated when the new portal is implemented on 13 February 2017 (est.). In the revised system invoices with errors will be rejected and invoices without errors will be accepted and imported.
- In a browser go to the ReturnToWorkSA website:http://www.rtwsa.com/online-services
- Click Login to log in with your username and password.
- Go to Online Services.
- Select the option to upload invoice.
- Locate the export file using the file selector.
- Click Submit.
- Once you've submitted the file, click the Refresh button to view the status of the upload.
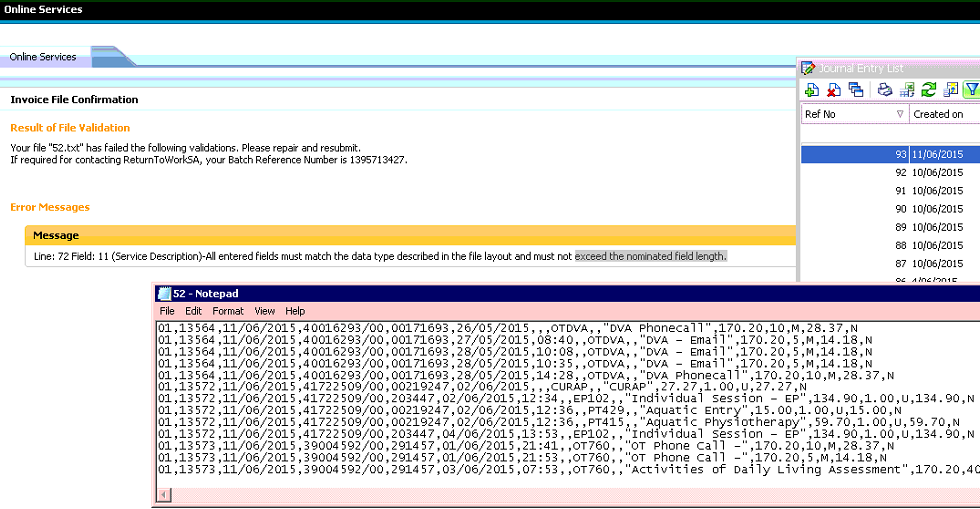
- If the upload has problems, such as in the example below, error message(s) will be generated and you need to fix the issue(s) before proceeding further.