
Employee List
Every user of Case Manager must be listed as an employee in the Employee List. This is the list of all employees (users) who are registered in your system.
To access the Employee List select Lists > Employee List from the main menu .
Standard grid tools are available, see List tools for more information. Thus, you can view your employees and their details, add new employees, print the list and export it to Excel.
The details of the selected member of the list are displayed at the
Employee information
This information is divided by a number of tabs.
The Employee tab contains work-related personal information (e.g. telephone, email address etc). This information can subsequently be inserted into documents using merge fields.
- The base rate is the hourly cost to the business to employ this person. It should take into account salary, sick and holiday leave, superannuation, office/ car overheads etc. This is used in some reports to indicate profits by comparing an employee’s base costs with their billed costs.
- A default employee provider number is stored here. Different authorities require different provider number based on categories and sometimes, different offices. These are stored elsewhere, see Employee provider numbers for full details.

Passwords
There are two password options:
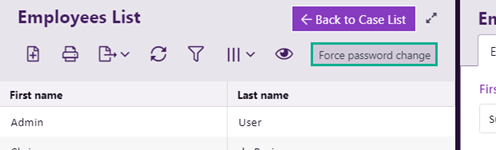
- To require all employees to change their passwords, click Force password change.
- To set the selected user's password click Set Password.
This option is above the list of employees.
The user logs in with this password and is immediately forced to enter a new password.
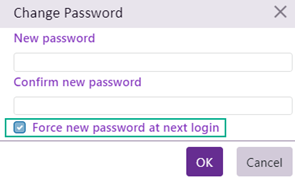
See Passwords for details.
Offices and teams
- Employees can be made members of offices, teams and categories.
- access to cases
- viewing other employees' cases at the Case List
- allocating tasks using system roles
- setting default values for cases and costs
This is useful for:
See Office, team and category membership for full details.
The minimum requirement is that an employee must be a member of at least one office.
If an employee has multiple office memberships the top office in the list is their default office.
When a new user is added they are automatically made a member of the default office for the user adding them. Naturally this can be changed.
Security Groups
Security groups have settings for all the system permissions and hence, they define exactly what a user can see and do in the system. An employee user must be a member of a security group in order to log in to the database.
- Allocate the employee to a security group at the Security tab.
Note that it is possible to set the value of one or more permissions for the employee at the Permissions tab. However, as explained below, you are strongly advised to make the employee a member of one or more security groups instead. Security groups have settings for all the system permissions and are much easier to maintain.
Further information about permissions is below. Security groups and their permissions are detailed in a separate section, starting at Introduction to security groups and permissions.
Employee email details
- These need to be set up before an employee can send emails from Case Manager, see Set up employee email accounts.
Assigned licences for employees
This setting applies to the operation of the Case Manager licenses that your business purchases.
- If Assign user license is ticked the employee has one license permanently assigned to them.
If this option is not ticked, the employee is assigned a license temporarily when they log on to Case Manager. It is released when they log off.
Thus, If Assign user license is ticked for an employee they can always log on to Case Manager. If it is not ticked and there are no unassigned licenses left they are unable to log on until another employee with a temporary license assignment releases it.
For full details about assigned and concurrent licenses see Case Manager licenses FAQ.
Employee services
- The Service field displays one or more services that an employee can provide, such as Counsellor or Exercise Physiologist.
These can be included in documents via merge fields
If you need to locate employees who can provide particular services you can add the Services column to the grid using the
When an employee leaves
- If an employee leaves your business it is important to disable their account by setting them as inactive, see When an employee leaves.
Permissions and the employee
You can also enter permissions that are specific to an employee at the Permissions tab.
When the Allow checkbox is ticked, employees have that permission, subject to the compilation of their permissions (see below). When the Allow checkbox is not ticked they do not have the permission, once again subject to compilation of permissions. The Deny checkbox applies only to the compilation of permissions.
You should only set permissions at the Permissions tab if you have very few employees or if a requirement is specific to only one employee. Individual permissions are very difficult to maintain when you manage a larger number of employees and must handle situations such as employee promotion or their departure from your business.
As mentioned, it is much better practice to assign permissions via security groups in the Security tab. A user can be added to or removed from a security group in a simple action and all their permissions will be reset. Similarly when a new release of Case Manager adds a new permission to the system, you need only set this up in the security groups, not in for each employee.
Compilation of permissions
When a user is a member of multiple security groups, Case Manager evaluates each permission by collecting the values for this permission in all of the user's security groups. These are compiled into one value per permission using two rules:
- If a permission has an Allow value in any of the security groups, this permission is collected into the set of Allows, i.e. allowable actions for the user.
- It is ejected from the set of allowable actions if a Deny value for this permission is located anywhere.
Note that when a value for the permission has been set per user, this value is also collected into the process described above and is subject to the same rules. Thus, it does not override settings for permissions in the user's security group(s).
Be aware that ticking the Deny box for a permission overrides any Allow permission set for a security group (including the System Administrator security group) or for a user.