Managing documents
The screenshots on this page do not all reflect the new web version yet.
The video shows the Windows version of Case Manager. The concepts are the same in the web version, except for managing Word documents.
Case Manager makes it easy to create, send, receive, store and manage all of the documents for a case in one place. These are accessed through its the Documentation tab.
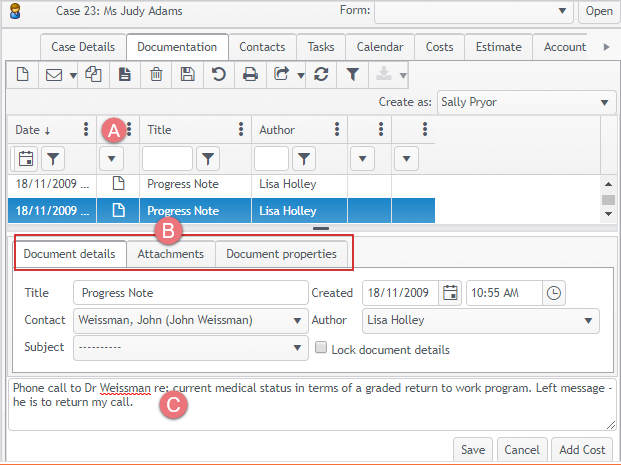
At the Documentation tab the list of case documents is a grid, with the features we already saw in Understanding the grid. Thus, the list can be filtered, grouped, sorted, printed and exported to Excel.
- The columns of the grid can show various document information, including icons that indicate:
- the type document: plain text, formatted text, email, Word document, etc
- the existence of costs linked to the document (we will see this later in Adding costs)
- for emails: the presence of attachments
- Document details are accessed by clicking these tabs.
- When a document is selected in the list, a document preview is seen below the grid.

The preview window can also act as an editing tool for plain and formatted text documents.
If you want to work on multiple documents at one time, you can open Case Manager in more than one browser window and move between them as needed.
Text and Word documents can be duplicated by clicking the duplicate button. The duplicate is time and date stamped.
Word documents can also be duplicated as PDF files.
You create a PDF document from a Word document by selecting it and clicking the PDF button ![]() .
.
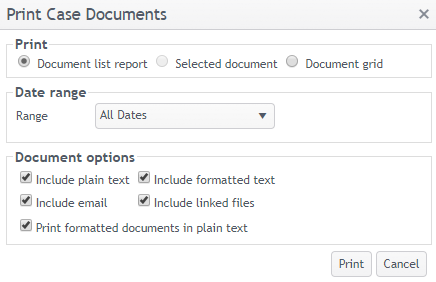
When you click the print button ![]() there are several options:
there are several options:
- print a compilation of the entire set of case notes
- print the selected document
- print the list of documents shown in the grid
There are further options to allow you to customise the compilation: what is included and how it is ordered.

The find facility helps you quickly locate a piece of information by searching one case or all cases in the database.
Next: Types of documents
