Create a workflow
The screenshots on this page do not all reflect the new web version yet.
Note that this video shows the Windows version of Case Manager, however the concepts are the same.
As the video shows, you create and view workflow templates at the Workflow Designer.
Access this by selecting Tools > Workflow Designer from the main menu.
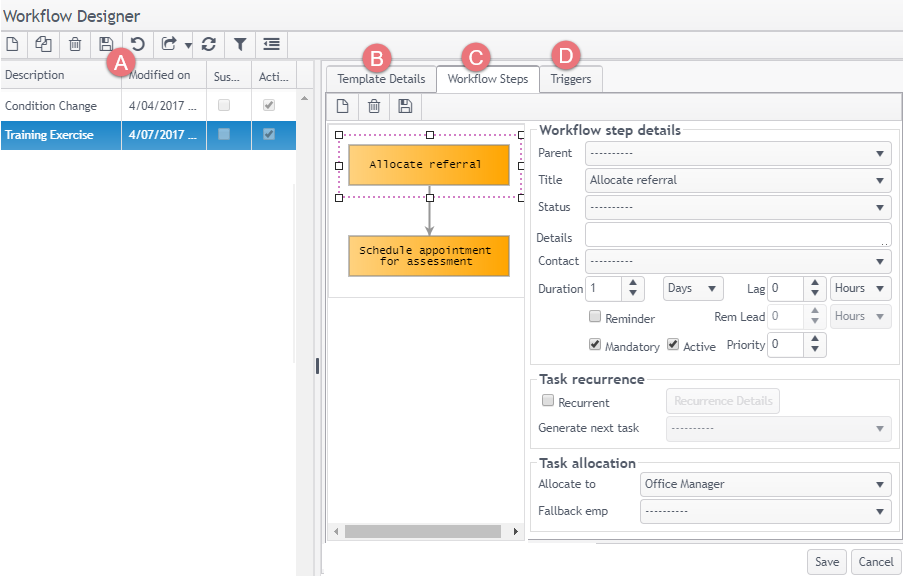
The screen is divided into areas:
- On the left there is a grid listing the workflows in your system.
On the right is the workflow designer. It has three tabs:
- Template Details: summary details of the selected workflow are displayed, including notes and whether it is active.
- Workflow Steps: the structured sequence of workflow steps is defined and displayed. This is shown here.
- Triggers: definition of the system conditions that trigger the workflow.
These have a duration and are allocated to a user or holders of certain system roles. They may have a reminder.
A number of system conditions can be identified and these can be restricted to certain categories, offices, etc.

Once a workflow template is triggered for a case, the workflow-generated tasks for the case are displayed at its Tasks tab.
Tasks with reminders will appear at a user's Reminders window when appropriate.
The user can see all their tasks over multiple cases at the list of Tasks, where they can be monitored in a number of ways. You have already learned about this at Task Management and Quality Management.
Note that before creating a workflow you may need to add new members to the Task Title List so that you have the specific titles you need for your workflow steps. Lab - Admin will demonstrate how to create a new task title when you get to the Administration module.
You will find much more detailed information in the rest of this site, starting at Workflows.
Next: Lab - Workflows
